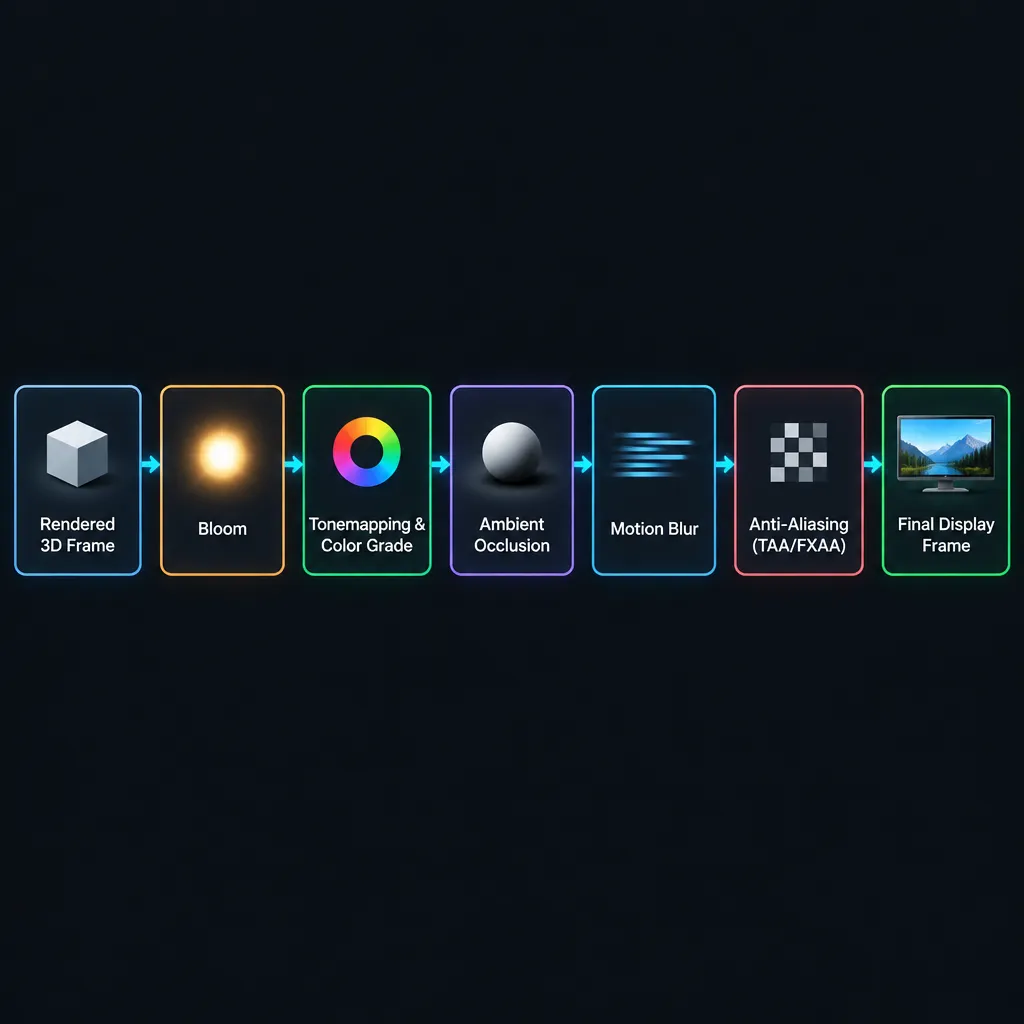
The frame on your monitor has already been rendered once by the time you see it. After the 3D scene is drawn into a flat image, the game runs a chain of full-screen filters over it, such as bloom, color grading, ambient occlusion, motion blur and anti-aliasing. That chain is post-processing. Most players should keep the cheap, useful parts and switch off the effects that blur or distract.
Key takeaways
- Post-processing means filters applied to the already-rendered 2D frame, just before it is displayed.
- One “Post Processing” slider often bundles several effects, so lowering it can remove bloom, blur or glow all at once.
- Cost grows with resolution, and a few effects (AO, SSR, depth of field) do most of the damage to FPS.
- In competitive games Low is the usual choice. In story games, turn off motion blur, DoF, grain and chromatic aberration and keep the rest.
- Some games rely on TAA to finish the image, so use DLSS, FSR or XeSS instead of switching anti-aliasing off.
Fact-checked
We checked these key facts against the sources named, on November 12, 2026:
- Microsoft’s Xbox Accessibility Guideline 117 sets out what developers are expected to do (source: learn.microsoft.com)
- That explains one community complaint: *with post processing On I get 55 FPS, with it Off 160 FPS (source: overtake.gg)
- That test compared two AO methods with each other, not AO against no AO, and it covers one 2016 game (source: gamersnexus.net)
- In GamersNexus’s Battlefield 1 test the cost was about 1 to 2%, and AO adds a lot of depth to the image (source: gamersnexus.net)
- In 2018, PUBG’s BattlEye anti-cheat blocked ReShade outright, so the game would not run while it was installed (source: pcgamer.com)
What is post-processing in games? (the 30-second answer)
Post-processing is the set of image effects a game applies to the finished frame after the 3D scene is rendered and before the image reaches your screen. The renderer draws the geometry, lighting and shadows into an off-screen image. A series of full-screen shader passes then changes that image, adding glow, adjusting exposure and color, darkening corners and smoothing jagged edges. For most players the short answer to “on or off?” is to keep the slider at Medium or High if your frame rate allows it, then turn off the individual effects you dislike. Competitive players usually pick Low.
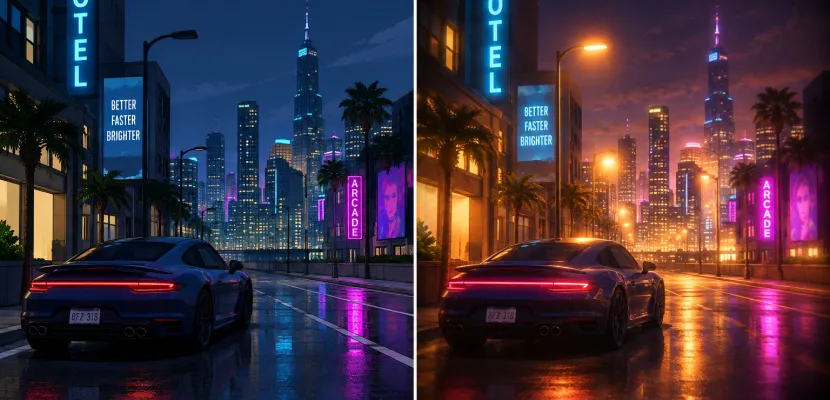
The term covers a lot because nearly anything that works on “the picture” rather than “the 3D world” can be done this way. Bloom, tonemapping, color grading, vignette, film grain, chromatic aberration and lens flare are classic post effects. Screen-space ambient occlusion and screen-space reflections are also usually run as full-screen passes, but they read the depth buffer and normals to fake 3D information from a 2D image. FXAA, SMAA and TAA anti-aliasing are post effects too. The live sketch at the end of this page has a before/after split. Move your mouse across it and you can watch each filter change the same frame.
Post-processing vs. the rest of the graphics pipeline
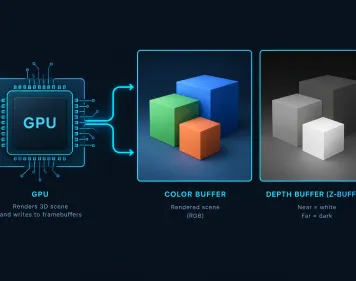
The main rendering pipeline works in 3D. It transforms meshes, decides which surfaces are visible using depth testing, shades each pixel with materials and lights, and writes the result into a color buffer plus a depth buffer. Post-processing begins once that work is done. It no longer deals in triangles. It reads pixels from textures and writes new pixels. This split explains why some settings belong to post-processing and others don’t. Shadow quality, texture resolution, view distance and geometry detail all change the 3D scene before it is flattened. Bloom, grading and vignette change what has already been flattened.
The line isn’t perfectly sharp. Modern engines such as Unreal Engine 5 mix in “screen-space” techniques that live in the post stage but affect lighting, and Unreal’s Lumen global illumination system handles much of the lighting work that older games faked with SSAO and SSR. In settings menus, developers draw the line wherever suits their game. That is why a slider called “Post Processing” covers different things in Fortnite than it does in Neverness to Everness.
Why it’s called “post”
“Post” means “after”, and the term comes from film and video. Footage is shot first and then graded, cleaned up and given effects in post-production. Real-time rendering borrowed both the word and many of the effects. A game’s tonemapper does the same job as a colorist’s exposure curve. Its film grain and vignette copy physical film and lenses. Its motion blur imitates a camera shutter left open for part of a frame. The big difference is the time budget. A film colorist can spend hours on one shot. A game at 60 FPS has about 16.7 milliseconds for the whole frame, and post-processing has to fit inside that alongside everything else.
What post-processing is for
Post-processing has three jobs. It makes the image read like something filmed by a camera or seen by an eye, it gives the game a mood and art direction, and it cleans up rendering artifacts such as jagged edges. Every effect in a settings menu does at least one of those. Knowing which job an effect does is the quickest way to decide whether you need it.
Realism cues
Our eyes and cameras do not see the world the way a raw renderer does, and post-processing adds back the imperfections we expect. Very bright lights bleed into their surroundings, so bloom adds a glow around them. Walking out of a dark tunnel into sunlight blinds you for a moment, so auto exposure brightens or darkens the frame over time. Objects outside a camera’s focal range go soft, which is what depth of field reproduces. Contact shadows gather in corners and creases, which is what ambient occlusion fakes. Without these cues a scene can look flat and “computer-generated” even when its models and textures are excellent. Many realism effects are subtle, and you often notice them only when they are gone.
Art direction and mood
Color grading, vignette, film grain and chromatic aberration are mostly about style, and players often hate them for that reason. A cold blue-green grade can make a horror game feel damp and hostile. Warm, crushed shadows give a western its dusty look. Heavy grain and vignette push a game toward found footage or 1970s film stock. Developers keep adding chromatic aberration and grain because they are cheap ways to say “this is a camera” and to hide banding in dark gradients. Players who want a clean, sharp image tend to switch them off. Neither side is wrong. Grain also hides the stepped color bands that show up in smooth skies on 8-bit displays, a technical benefit you lose when you turn it off.
Image cleanup
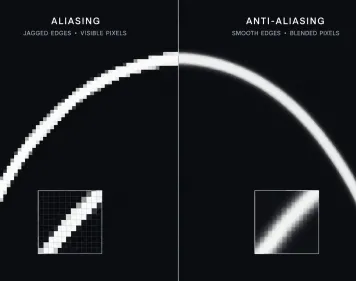
The third job is fixing what the renderer gets wrong. Rasterizing triangles onto a pixel grid produces jagged, shimmering edges, and post-process anti-aliasing (FXAA, SMAA and especially TAA) smooths them out. Temporal upscalers such as NVIDIA DLSS, AMD FSR and Intel XeSS extend the same idea. They render fewer pixels, then rebuild a sharp, anti-aliased image using data from earlier frames. In a modern game this cleanup work is often the most important post effect in the chain, and switching it off can expose problems the art was designed to hide.
Every common post-processing effect, explained
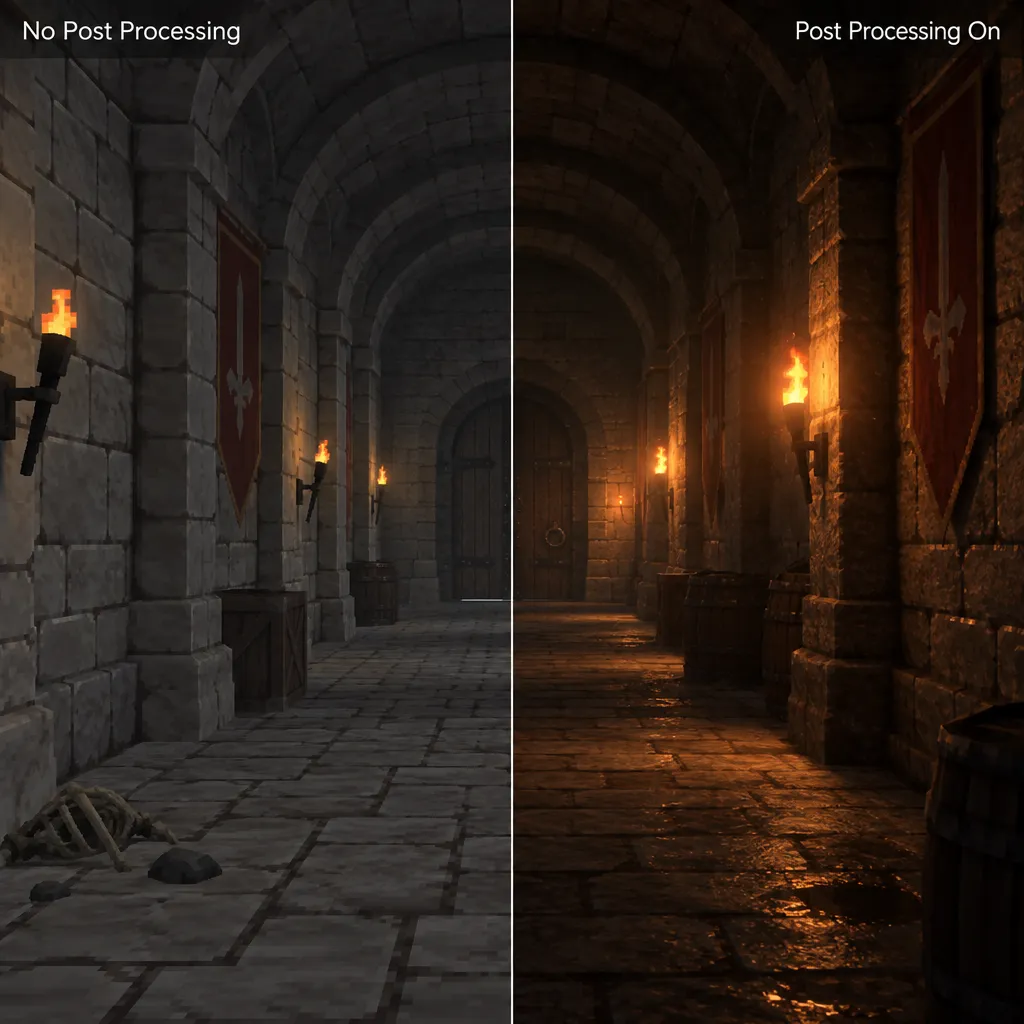
Each effect has a different cost and purpose, and players treat each one differently. The table gives the overview. The sections after it explain how each effect works and what to do with it. Cost is shown in broad bands because the real number depends on the game, the resolution, the quality preset and your GPU.
| Effect | What it does | Typical FPS cost | Competitive | Cinematic | Motion-sickness risk |
|---|---|---|---|---|---|
| Bloom | Glow around bright light sources | Low to moderate | Low or off | On | Low |
| Tonemapping / auto exposure | Maps HDR brightness to your screen, adapts exposure | Very low | On (usually not optional) | On | Low |
| Color grading / LUT | Shifts color and contrast for mood | Very low | Neutral grade | On | None |
| Ambient occlusion (SSAO, HBAO+) | Soft contact shadows in corners and creases | Moderate | Optional | On | None |
| Screen-space reflections | Reflections built from on-screen pixels | Moderate to high | Off | On if affordable | Low |
| Depth of field | Blurs what is outside the focus range | Moderate to high | Off | Taste | Moderate |
| Motion blur | Smears moving objects or the camera | Low to moderate | Off | Taste | High |
| Chromatic aberration | Splits color channels toward the edges | Very low | Off | Taste | Low |
| Film grain | Animated noise over the image | Very low | Off | Taste | Low |
| Vignette | Darkens the corners | Very low | Off | On | None |
| Lens flare | Streaks and ghosts from bright lights | Low | Off | Taste | Low |
| FXAA / SMAA | Smooths edges from the final image | Very low / low | Taste | Taste | None |
| TAA / DLSS / FSR / XeSS | Smooths edges using past frames, often upscales | Low (upscalers often gain FPS) | Upscaler on | On | Low |
Bloom
Bloom makes very bright pixels glow into their neighbors, the way a streetlight seems to spread a halo at night. The usual method is to pull out every pixel brighter than a threshold, blur that bright-only copy several times at shrinking resolutions, and add it back onto the frame. The downsampling keeps it fairly cheap, though a wide, high-quality bloom still takes several passes. Bloom pairs naturally with emissive materials, the neon signs and glowing UI elements that are meant to look like light sources. It works best with HDR (high dynamic range) rendering. When the frame stores values above 1.0, the game can tell a lightbulb from a white wall, and only the bulb blooms.
Tonemapping and auto exposure (eye adaptation)
Tonemapping turns the renderer’s high-dynamic-range values into the limited range your screen can show, and it is the one effect you almost never get to switch off. Without it, everything brighter than display white clips to flat white and loses detail. Common curves include ACES, the Academy Color Encoding System’s filmic curve, and the “Filmic” curves engines ship by default. Unity URP’s Tonemapping override offers Neutral and ACES modes. Auto exposure sits beside it. Epic Games’ Unreal Engine 5 documentation describes auto exposure, also called eye adaptation, as adjusting the exposure based on the current scene luminance. It is the reason a sunlit doorway looks blinding from inside a dark room until your view settles.
Did you know?
Epic’s Unreal Engine 5 documentation also calls auto exposure “eye adaptation”. It copies the way your eyes adjust when you walk from a dark room into sunlight, using the scene’s current luminance.
Color grading and LUTs
Color grading changes hue, saturation, contrast and white balance across the whole frame to set a mood. Many games do this with a LUT (lookup table), a small 3D texture that maps every input color to an output color in one texture read. Artists build the look in a photo or video tool, bake it into the LUT, and the game applies it for almost nothing. The Unity 6.5 URP effect list includes a Color Lookup override for exactly this, next to Color Adjustments and Channel Mixer. Grading costs so little that you have no performance reason to remove it. If a game lets you pick a “neutral” or “vivid” filter, that choice is usually a different LUT.
Ambient occlusion (SSAO, HBAO+)
Ambient occlusion darkens the places where surfaces meet: under furniture, inside cracks, where a wall meets the floor. Without it, objects look as if they hover. Screen-space ambient occlusion (SSAO) estimates this from the depth buffer by sampling points around each pixel and checking how many are hidden. NVIDIA’s HBAO+ (horizon-based ambient occlusion) samples more carefully and usually gives cleaner, better-placed shadows. AO is among the more expensive common post effects because it takes many samples per pixel, but the real cost varies more than its reputation suggests. The FPS section below covers the measurements. Engines with real-time global illumination, such as Unreal’s Lumen, handle part of this occlusion inside the lighting itself.
Screen-space reflections
Screen-space reflections (SSR) build reflections on wet roads, polished floors and water by tracing rays through the depth buffer and borrowing pixels that are already on screen. That shortcut causes the effect’s well-known flaw. Anything off-screen or hidden can’t be reflected, so reflections fade or vanish as you tilt the camera. SSR is often expensive, especially at high quality with many ray steps, and it is a common first cut when you need frames. Ray-traced reflections and Lumen reflections in Unreal Engine 5 avoid the off-screen problem by working in world space, and they cost much more.
Depth of field
Depth of field (DoF) blurs whatever lies outside the focal range, both in front of and behind the focus point. It doesn’t simply “blur far objects”, a common simplification. In a cutscene focused on a character’s hands, the face behind can blur. In a sniper view focused at long range, the rifle in front of you can blur. Games use DoF in cutscenes, photo modes, aim-down-sights views and sometimes during normal play. Good bokeh-style DoF is fairly expensive because it gathers many samples per pixel at varying radii. Competitive players almost always turn it off because it can hide a target that sits outside the focus band.
Motion blur
Motion blur smears pixels along their direction of movement, using a velocity buffer that records how far each pixel moved since the last frame. Per-object motion blur smears only fast-moving things such as a spinning wheel. Camera motion blur smears the whole screen when you turn. At low frame rates a little blur can make motion look smoother, which is why console games running at 30 FPS often keep it. At high frame rates it mostly costs clarity. It is also the effect most often linked to motion sickness, which is covered later.
Chromatic aberration, film grain, vignette and lens flare
These four imitate a physical camera, and all are cheap. Chromatic aberration offsets the red and blue channels outward toward the edges of the frame, like a cheap lens failing to focus all colors at once. Film grain adds animated noise. Vignette darkens the corners to pull your eye to the center. Lens flare draws streaks and ghost shapes from bright lights, and the Unity 6.5 URP list includes a Screen Space Lens Flare override for it. None of them costs much, so turning them off is about taste and clarity, not FPS. Many players switch off chromatic aberration and grain on day one. Vignette is subtler, and most people never notice it.
Studio tip
Turn off motion blur, depth of field, chromatic aberration and film grain first. Players most often find these effects distracting, and blur and DoF are the usual motion-sickness triggers. The rest of the post stack can stay.
Post-process anti-aliasing: FXAA, SMAA, TAA, and where DLSS, FSR and XeSS fit
Not all anti-aliasing is post-processing. MSAA (multisample anti-aliasing) happens while geometry is rasterized: it takes several coverage samples per pixel along triangle edges. FXAA and SMAA are pure post effects that look for edges in the finished image and blur along them. TAA (temporal anti-aliasing) is also a post pass. It jitters the camera slightly every frame and blends the current frame with reprojected earlier ones, which smooths edges and the shimmer inside surfaces. A common myth says that “more AA means more blur”. That holds for FXAA and, to a lesser degree, TAA. It does not hold for MSAA or for a well-tuned upscaler. The broader trade-offs of antialiasing techniques for real-time graphics are a topic of their own. This table covers the methods players actually meet in menus.
| Method | Post-process? | Blur risk | Cost | Notes |
|---|---|---|---|---|
| MSAA | No (happens at rasterization) | Low | High in deferred renderers | Misses shader and texture shimmer. Unreal supports it only with forward shading |
| FXAA | Yes | High | Very low | Fast and soft, blurs fine texture detail |
| SMAA | Yes | Low to moderate | Low | Sharper than FXAA, weaker on motion shimmer |
| TAA | Yes | Moderate, can ghost | Low to moderate | Handles shimmer well, and many games depend on it |
| DLSS / FSR / XeSS | Yes (temporal reconstruction) | Low on recent versions | Often a net FPS gain | Renders fewer pixels and rebuilds the frame. Replaces TAA |
Upscalers are the modern replacement for older post-process AA. NVIDIA’s DLSS 4.5, announced at CES 2026, introduced a second-generation transformer Super Resolution model that NVIDIA says improves stability, anti-aliasing and clarity. It is available to all GeForce RTX users through the NVIDIA app in more than 400 titles. AMD has merged its upscalers under the FSR Upscaling name: machine-learning FSR 4 on its newest Radeon cards and an analytical fallback on older ones. Intel’s XeSS runs on GPUs from several vendors. Frame generation is a separate feature. DLSS 4.5 added Dynamic Multi Frame Generation and a 6X mode for RTX 50 Series cards, which reached players through the NVIDIA app in spring 2026. Generated frames make motion look smoother, but they don’t reduce the time between your input and the next frame the game actually renders.
Did you know?
NVIDIA says DLSS 4.5’s Multi Frame Generation 6X mode can generate five extra frames for every frame the game actually renders. The mode is limited to RTX 50 Series cards.
Does post-processing affect FPS?
Yes. How much depends on which effects the setting includes and on your resolution. Tonemapping, grading, vignette, grain and chromatic aberration cost almost nothing. Ambient occlusion, screen-space reflections, depth of field and high-quality bloom can each cost a noticeable slice of the frame. The size of the drop also varies between games, GPUs and quality levels, so community reports range from “no difference” to “doubled my FPS”.
Cheap vs. expensive effects
An effect’s cost comes down to how many texture reads it does per pixel and how many passes it needs. A vignette reads one pixel and multiplies it by a number, about the cheapest operation a GPU can do. Color grading through a LUT adds one more texture read. SSAO may take 8 to 32 depth samples per pixel and then blur the result. SSR walks along a ray in steps and may take dozens of reads per pixel. Bokeh depth of field gathers samples in a disk whose size varies with distance. These heavy effects also tend to have their own quality settings, and “Epic” or “Ultra” often means more samples, full-resolution buffers instead of half-resolution ones, and extra denoising passes.
That explains one community complaint: with post processing On I get 55 FPS, with it Off 160 FPS. Why is the difference so big? A gap that large almost never comes from bloom and vignette. It usually means the game’s post-processing switch also controls heavy effects at their top quality, such as AO, SSR or volumetric fog, or that turning it off moved the bottleneck from the GPU to the CPU. The fix is to stop treating the slider as a single setting and find out which effect inside it is expensive.
Is SSAO good for performance?
SSAO costs some FPS, but the measured cost is often smaller than its reputation. GamersNexus tested ambient occlusion in Battlefield 1 and found that switching between HBAO and SSAO changed performance by about 1.4% on an AMD RX 480 at 1440p Ultra. On an NVIDIA GTX 1080 at 1440p the difference was about 2 FPS on average, which the outlet called negligible. That test compared two AO methods with each other, not AO against no AO, and it covers one 2016 game. Its lesson still holds: in a well-optimized engine, AO is rarely the main reason a game runs badly. In other titles, especially at maximum AO quality, the cost can be much higher.
Keep AO if you can
Keep ambient occlusion on if you have headroom. In GamersNexus’s Battlefield 1 test the cost was about 1 to 2%, and AO adds a lot of depth to the image.
Why resolution changes everything
Most post effects run once per pixel, so their cost scales with the number of pixels on screen. 1080p has about 2.1 million pixels, 1440p about 3.7 million and 4K about 8.3 million. A full-screen pass that takes 0.5 ms at 1080p will take close to 2 ms at 4K, all else equal, and a stack of ten passes adds up quickly. This is why turning down post-processing helps more at 4K than at 1080p. It is also why upscalers help so much: with DLSS, FSR or XeSS, many post effects run at the lower internal resolution before the image is reconstructed. On a 1080p monitor with a fast GPU, post-processing may barely register in your frame time.
To find out what a setting costs on your own machine, measure it.
Quick steps: measure what a post setting costs
- Pick one repeatable scene, such as a fixed spot in a hub area or a benchmark run.
- Turn on a frame-time overlay that shows average FPS and 1% lows.
- Record 30 to 60 seconds at your current settings.
- Change exactly one setting by one step and record the same scene again.
- Compare both the averages and the 1% lows, then keep the step that is worth it.
The 1% lows matter as much as the average. Some effects barely move average FPS but add spikes during explosions or fast camera turns, and the spikes are what you feel as stutter.
Lower it one step at a time
Don’t judge the whole “Post Processing” slider at once. Lower it one step at a time in the same scene and watch both average FPS and 1% lows. Some games bundle cheap and expensive effects together, and the middle step is often the best trade.
Should post-processing be on or off?
For most players the answer is somewhere in between. Keep the slider where your frame rate stays comfortable, then switch off the individual effects that blur or distract. Competitive players usually go to Low. Players of slow, cinematic games usually keep it high and turn off motion blur and grain. On low-end PCs and phones, post-processing is one of the first settings to drop.
| Player / hardware | Post Processing slider | Keep on | Turn off | Why |
|---|---|---|---|---|
| Competitive shooter, any PC | Low | Upscaler or TAA, tonemapping | Motion blur, DoF, grain, CA, lens flare | Brighter, clearer image and fewer effects hiding targets |
| Story or exploration game, strong GPU | High or Epic | Bloom, AO, SSR, grading | Grain and CA if you dislike them | The art is built around these effects |
| Mid-range PC at 1440p | Medium | AO, bloom, upscaler | DoF, motion blur, SSR at max quality | Most of the look for a fraction of the cost |
| Low-end PC or integrated graphics | Low | Upscaler if supported | AO, SSR, DoF, motion blur | Full-screen passes eat a small GPU’s budget |
| Laptop on battery | Low | Upscaler | Most optional effects | Less GPU work means less heat and longer battery life |
| Android or mobile | Lowest available | Basic tonemapping | Bloom, DoF, AO | Mobile GPUs pay heavily for full-screen passes |
| Motion-sensitive player | Any | Everything else | Motion blur, DoF, camera shake, head bob | These are the usual motion-sickness triggers |
Competitive shooters
In competitive games, post-processing works against what you need: seeing a small, distant target clearly and reacting fast. DoF can blur that target, motion blur smears it while you turn, bloom and lens flare can wash out an enemy standing near a light, and heavy grading can darken shadows where players hide. That is why Low is the standard pro choice in games like Fortnite, as the next section shows. Does it actually help in competitive play? Mostly through visibility and steadier frame times rather than raw FPS. A cleaner, brighter image is a real advantage. The extra frames you gain from post-processing alone tend to be modest unless the slider bundles heavy effects.
Studio tip
In competitive shooters such as Fortnite, Low post-processing is the usual pro choice. The image is brighter and has fewer effects that hide targets.
Story and exploration games
In single-player games built around atmosphere, post-processing is part of the art direction, and turning all of it off often makes the game look worse rather than “cleaner”. Lighting artists balance their scenes with bloom, AO and a specific grade turned on. Remove them and interiors can look flat, skies can band, and emissive lights lose their glow. A common question is: should I disable blur, depth of field and AA for clarity, or does that make the game look worse? Blur and DoF: yes, if you prefer a sharp image. They are optional extras. AA: no. Replace it with a better method instead, for the reasons below.
Low-end PCs and phones
On weak hardware every full-screen pass takes time the GPU doesn’t have, so post-processing should be one of the first things you lower. This matters most on phones. Mobile GPUs are usually tile-based, meaning they render the screen in small tiles kept in fast on-chip memory. Each full-screen post pass forces the whole frame to be written out to main memory and read back, which costs bandwidth, battery life and heat. That is why mobile games often switch off bloom and DoF entirely on lower presets. On a laptop running on battery the same logic applies: less GPU work means cooler, quieter play and more time away from the charger.
When turning it off makes things worse (TAA-dependent games)
Some modern games need temporal anti-aliasing to finish the image, so switching it off can break things. One player asked: I turned off TAA and now the trees have barely any leaves. Is that normal? It is, and it is expected. To save performance, many engines draw foliage, hair and soft transparency as a dithered pattern of on and off pixels and rely on TAA to blend that pattern across frames into a smooth result. Without TAA you see the raw dither: thin, noisy leaves, broken hair and shimmering edges. Some games also render effects like reflections or shadows at reduced resolution and depend on the temporal pass to clean them up.
Don't switch off AA, swap it
If disabling TAA makes foliage or hair look broken or thin, the game depends on it. Switch to DLSS, FSR or XeSS instead of turning AA off. You keep the temporal cleanup and often gain FPS.
What the “Post Processing” slider does in popular games
In many games, a single “Post Processing” quality slider controls a whole bundle of effects, and each developer decides what goes into that bundle. Lowering it can remove bloom, glow, motion blur or tone adjustments all at once, even when those effects have no toggles of their own. Here is what the slider is reported to control in two games players ask about often.
| Game | What the slider bundles | Recommended level | Source |
|---|---|---|---|
| Fortnite | Brightness and contrast, diffused lighting, object glow | Low for competitive play | PC Gamer, GamesRadar, pro settings lists |
| NTE (Neverness to Everness) | Lighting and effects such as bloom, DoF and AO, per community guides | Low on low-end, Medium on mid-range, Ultra on high-end PCs | Dexerto and NTE settings guides |
| Unreal Engine 5 games (general) | Engine’s Post Process scalability group: quality of effects like bloom, DoF, motion blur, AO | Medium as a starting point | Epic Games’ Unreal Engine documentation |
Fortnite
According to PC Gamer’s competitive settings guide, Fortnite’s Post Processing setting covers diffused lighting and glow effects, and it also sets brightness and contrast for how light behaves on most objects. The visible result is a darker, moodier image on higher settings. PC Gamer says Medium through Epic noticeably darken the sniper-scope view, while Low makes it considerably brighter. GamesRadar likewise notes that the scope view is noticeably brighter on the lowest setting and calls Low tactically useful. Pro settings lists for Fortnite show the same pattern, with Post Processing on Low. So the answer to does post-processing on Low make the sniper scope brighter in Fortnite? is yes, and it is the main reason competitive players pick Low.
NTE (Neverness to Everness)
Neverness to Everness, the open-world urban RPG that launched in April 2026, has a Post Processing option that settings guides scale with hardware. Dexerto’s guide recommends Low on low-end PCs, Medium on mid-range PCs and Ultra on high-end PCs. When you need more FPS, it suggests lowering Post Processing together with Global Illumination Mode. Community guides list bloom, depth of field and ambient occlusion among the effects it governs. They often suggest keeping bloom and AO while disabling depth of field and motion blur for clearer driving and combat. On a mid-range PC, start at Medium and drop to Low only if you are still GPU-bound. Guides also point out that Traffic Density often helps more with city stutter than post effects do.
How to find out what your game’s slider bundles
Most games don’t say exactly what their slider covers, but you can work it out in a few minutes. First, read the setting’s description. Many games show a one-line tooltip or preview image. Second, check whether motion blur, DoF, grain and chromatic aberration have their own toggles. If they don’t, they are probably inside the slider. Third, test it: stand in front of a bright light near some geometry, then step the slider from highest to lowest and watch which changes appear, such as glow, corner shadows, reflections or overall brightness. For Unreal-based games, Epic’s engine has a Post Process quality group within its scalability system, and many studios map their menu slider onto it. That is a sensible starting assumption, though you shouldn’t treat it as confirmed for any given game.
Post-processing and motion sickness
Motion blur, depth of field and camera effects are the post-processing features most often linked to motion sickness, and good games let you turn each one off. The discomfort comes from a mismatch: your eyes see blurred, swaying motion that your inner ear doesn’t feel. Full-screen camera motion blur during fast turns is the classic trigger. Shifting depth of field, camera shake, head bob and a narrow field of view can all add to it.
Microsoft’s Xbox Accessibility Guideline 117 sets out what developers are expected to do. It treats motion blur, field of view, camera bobbing, weapon sway and automatic camera changes as critical motion-sickness settings that players should be able to adjust. Note that several of these, such as head bob and weapon sway, are camera animation rather than post-processing. Players experience them together, so the guideline groups them, and you should too when setting up a game. If you get headaches or nausea, turn off motion blur and DoF, raise the field of view, and look for camera shake and head bob toggles.
Those toggles aren’t always under Graphics. Many games list them under Accessibility, Camera, Display or Comfort instead, and the same game can split them across two menus. If a game has a Post Processing slider but no separate motion blur toggle, lowering the slider may be the only way to remove the blur. The trade-off is that you lose the bloom and grading the art was built around. A steady frame rate also helps comfort, because uneven frame pacing makes motion look jerky whatever the blur setting.
How post-processing actually works (try it yourself)
In code, post-processing is simple. The game draws the scene into a texture instead of straight to the screen, then draws one rectangle covering the whole screen with a fragment shader that reads that texture and writes modified pixels. Each effect is one such pass, or a few, and the passes run in a fixed order. Once you have built one, every effect in a settings menu makes more sense.
The frame as a texture
The first step is rendering to a texture. In OpenGL and WebGL this means attaching a texture to a framebuffer object and drawing the scene into it. In p5.js you can draw into a createGraphics() buffer and then hand that buffer to a shader as a sampler2D uniform. The post shader runs once for every pixel on the screen. Each run gets its screen position, reads the color stored at that spot in the scene texture (and, for effects like AO and DoF, the depth texture), does some math and returns a new color. Because every pixel runs the same code independently, the GPU can process hundreds of thousands of them in parallel. That is why a full-screen pass is cheap when the math is simple and expensive when each pixel reads dozens of neighbors.
Writing your first post effect (vignette in about 10 lines)
A vignette is the “hello world” of post-processing: read the pixel, measure its distance from the center of the screen, darken it. This GLSL ES fragment shader works in WebGL 1 and in p5.js 1.x, given a vertex shader that passes texture coordinates through as vTexCoord.
precision mediump float;
uniform sampler2D uScene;   // the finished frame
varying vec2 vTexCoord;     // 0.0 to 1.0 across the screen void main() {
  vec3 color = texture2D(uScene, vTexCoord).rgb;
  float d = distance(vTexCoord, vec2(0.5));   // 0 at the centre, about 0.7 in a corner
  color *= 1.0 - smoothstep(0.4, 0.8, d);     // fade to black towards the edges
  gl_FragColor = vec4(color, 1.0);
}
Film grain takes one more line: add a small random value per pixel that changes every frame, such as a hash of the pixel position plus time. Chromatic aberration reads the texture three times, with the red and blue samples pushed slightly outward from the center. If you have worked with Perlin noise for creative coding, you already know the tools. Smooth noise gives you softer, film-like grain, and per-pixel hash noise gives you sharp digital grain.
Why order matters: bloom → tonemap → grade → grain
Effects can’t run in an arbitrary order, because each one expects a certain kind of input. Bloom has to run on HDR values before tonemapping. Once the tonemapper has squeezed everything into the 0 to 1 range, a lightbulb and a white wall have the same value and bloom can no longer tell them apart. If you add bloom after tonemapping, the halos push values past 1.0 again and clip to flat, ugly white. Grading comes after tonemapping, because LUTs are authored for display-range color. Grain and vignette go last, so the noise isn’t blurred or graded away. Upscalers sit early in the chain. NVIDIA’s integration guidance generally places DLSS ahead of effects like bloom, tonemapping and grain, so those run on the reconstructed full-resolution image.
| Pass | Works on | Why it goes here |
|---|---|---|
| AO, SSR | HDR scene plus depth | Needs lighting and depth, before anything blurs the frame |
| TAA or upscaler | HDR scene plus motion vectors | Cleans edges before effects that spread pixels around |
| Depth of field, motion blur | HDR scene | Blurring HDR values gives brighter, more natural bokeh |
| Bloom | HDR scene | Needs values above 1.0 to find true light sources |
| Tonemapping, exposure | HDR to display range | Converts to what the screen can show |
| Color grading / LUT | Display range | LUTs are authored for this range |
| Vignette, CA, grain | Display range | Final camera “texture” on top of everything |
The live sketch below has an O key that swaps bloom and tonemapping, so you can see the clipped-halo failure for yourself.
Unity URP Volumes and Unreal Post Process Volumes
Both major engines wrap this chain in a volume system that blends effect settings by location. In Unity’s Universal Render Pipeline, post-processing effects are implemented as Volume Overrides. Each Volume component references a Volume Profile containing one or more overrides, and when Volumes overlap, URP applies the one with the highest Priority value. Unity’s current URP effect reference lists overrides including Bloom, Channel Mixer, Chromatic Aberration, Color Adjustments, Depth of Field, Tonemapping and Vignette. The Unity 6.5 version adds Color Lookup and Screen Space Lens Flare to that list. A Volume’s mode can be Global (everywhere) or Local (inside a collider), and the camera must have post-processing enabled. Unity’s Graphics settings also include a “Strip Unused Post Processing Variants” option. When it is on, Unity assumes the built game won’t create new Volume Profiles at runtime, which keeps build sizes smaller.
Unreal Engine 5 does the same with a Post Process Volume placed in the level. Its “Infinite Extent (Unbound)” option makes it apply everywhere, and its blend settings let several volumes combine. Epic’s documentation notes that when no volume is placed, default values come from Project Settings > Rendering > Default Settings. That is why a new UE5 project already has auto exposure and bloom switched on. Both engines also let designers keep an effect’s settings in the volume and expose its quality to players separately. That separation is what eventually shows up as the “Post Processing” slider in your settings menu. Interactive installations use the same chain. A TouchDesigner network or a projection mapping rig often ends in a grading and bloom stage for the same reasons a game does.
Adding or removing post effects yourself: ReShade and driver tools
ReShade is a free, open-source post-processing injector. It sits between a game and the graphics API and runs its own shader passes on the finished frame, so you can add effects a game lacks, such as better sharpening, a different grade or an ambient occlusion pass. Some players turn off a game’s built-in post-processing and use ReShade to put back only the effects they like. Is that worth it? For single-player games with a heavy-handed default look, it can be. You get exact control over each effect. The downsides are setup time, a new performance cost from every shader you add, and effects that may not know about the game’s HUD or depth, so a ReShade AO pass can draw shadows over menus.
Online games are a different matter. Anti-cheat systems watch for software that hooks into the rendering process, and they don’t always tell a harmless color filter from a wallhack. In 2018, PUBG’s BattlEye anti-cheat blocked ReShade outright, so the game would not run while it was installed. ReShade’s own forum notes that it limits depth-buffer access in multiplayer games as a precaution, and its developer has warned that using post-processing injectors in multiplayer games carries a ban risk from anti-cheat heuristics. The ReShade site offers a separate build with full add-on support that is meant for single-player games. For anything online, the official route is the game’s own settings, or vendor tools the game supports, such as NVIDIA’s Freestyle filters in the NVIDIA app, which work only in games NVIDIA has approved.
Heads up
Check each online game’s rules before injecting any post-processing tool. A block or ban for a “harmless” filter still costs you the account. The in-game settings carry no such risk.
Social platforms raise a related question. Players sometimes ask for a client-side switch to disable post-processing when a VRChat world’s effects are too heavy or too bright. In platforms like that, post-processing is usually part of the world itself, built by its creator in Unity, so the available options are the platform’s own graphics and comfort settings and feedback to the world’s creator. Third-party workarounds are not among them.
FAQ
Does post-processing affect FPS?
Yes, but the cost depends on which effects the setting includes. Tonemapping, grading, vignette and grain are nearly free. Ambient occlusion, screen-space reflections, depth of field and high-quality bloom cost the most. The impact also grows with resolution, because most post passes run once per pixel, so 4K pays roughly four times what 1080p does.
What is the purpose of post-processing?
It makes the rendered image look like something seen through a camera or eye (bloom, exposure, depth of field), sets the mood and art style (color grading, vignette, grain), adds depth cues (ambient occlusion), and cleans up rendering artifacts (anti-aliasing and upscaling). Each effect does one or more of those jobs.
Should post-processing be on or off?
Usually somewhere in the middle. Keep it on at a level your GPU handles comfortably, then turn off motion blur, depth of field, chromatic aberration and film grain if you dislike them. Competitive players generally choose Low. Turning everything off can make story-driven games look flat and can break games that depend on TAA.
Is SSAO good for performance?
SSAO costs some performance but often less than players expect. GamersNexus found that switching between HBAO and SSAO in Battlefield 1 changed performance by about 1.4% on an RX 480 at 1440p Ultra. Costs vary by game and AO quality level, so test it in your own game.
What does post process quality do?
It sets how good, and how expensive, the bundled post effects are. Higher levels usually mean more samples per pixel, full-resolution buffers and extra effects. Lower levels use half-resolution buffers or remove effects entirely. Exactly what is bundled differs from game to game.
What is post processing in Fortnite?
In Fortnite it mainly controls brightness and contrast plus lighting effects such as diffused lighting and object glow. Competitive guides recommend Low, partly because the sniper-scope view is noticeably brighter at the lowest setting.
What is post processing in NTE?
In Neverness to Everness it governs lighting and screen effects. Community guides list bloom, depth of field and ambient occlusion among them. Settings guides recommend Low on low-end PCs, Medium on mid-range PCs and Ultra on high-end PCs. When chasing FPS, lower it along with Global Illumination Mode.
Is anti-aliasing a post-processing effect?
Some of it is. FXAA, SMAA and TAA are post-process passes that work on the rendered image, and DLSS, FSR and XeSS are temporal reconstruction passes in the same stage. MSAA is not, because it happens during rasterization by taking extra samples along triangle edges.
Does post-processing add input lag?
Indirectly. Every post pass adds GPU time to the frame, and a longer frame means slightly more delay between your input and the image. Fewer, cheaper effects mean lower latency. Frame generation is the bigger factor. Generated frames make motion look smoother without making the game respond faster.
Should I turn off post-processing for competitive games?
Lower it rather than switching off what keeps the image intact. Set the slider to Low and disable motion blur, depth of field, lens flare, grain and chromatic aberration. Keep tonemapping and a temporal AA method or upscaler, so edges stay stable and foliage renders correctly.
Try it live
This sketch builds a small post-processing chain in p5.js 1.x, which is free and runs in your browser. A city scene is drawn into an off-screen buffer, and one full-screen shader applies bloom, ACES tonemapping, vignette, chromatic aberration and film grain in order. Press 1 to 5 to toggle the effects and O to swap bloom and tonemapping. Move the mouse to compare the raw frame on the left with the processed frame on the right.
Heads up
The one-pass bloom reads the frame 16 times per pixel, and chromatic aberration triples that. On a weak integrated GPU, switch chromatic aberration off if the sketch stutters.
// Post-processing playground: a 2D scene is drawn into an off-screen buffer
// (the "frame"), then one full-screen shader applies the post effects in order.
// Keys: 1 bloom, 2 tonemapping, 3 vignette, 4 chromatic aberration, 5 grain.
// O swaps bloom and tonemapping. Left of the mouse shows the raw frame.
let scene, hud, post;
let fx = { bloom: true, tone: true, vig: true, ca: false, grain: false };
let bloomFirst = true;

const vert = `
attribute vec3 aPosition;
uniform mat4 uModelViewMatrix;
uniform mat4 uProjectionMatrix;
void main() {
  gl_Position = uProjectionMatrix * uModelViewMatrix * vec4(aPosition, 1.0);
}`;

const frag = `
precision highp float;
uniform sampler2D uScene;
uniform vec2 uRes;
uniform float uSplit, uTime, uBloomFirst, ubloom, utone, uvig, uca, ugrain;
// Read the frame and boost it so bright lights go past 1.0, like an HDR buffer
vec3 hdr(vec2 uv) { return texture2D(uScene, uv).rgb * 1.8; }
// One-pass bloom: gather only the over-bright part of nearby pixels
vec3 bloom(vec2 uv) {
  vec3 sum = vec3(0.0);
  for (int i = 0; i < 16; i++) {
    float a = float(i) * 2.4;
    float r = sqrt(float(i) + 0.5) * 7.0;
    sum += max(hdr(uv + vec2(cos(a), sin(a)) * r / uRes) - 1.0, 0.0);
  }
  return sum / 16.0 * 3.0;
}
// ACES filmic curve (Narkowicz fit): squeezes bright values into 0..1
vec3 aces(vec3 x) {
  return clamp((x * (2.51 * x + 0.03)) / (x * (2.43 * x + 0.59) + 0.14), 0.0, 1.0);
}
// Bloom and tonemapping, in whichever order is selected
vec3 shade(vec2 uv) {
  vec3 c = hdr(uv);
  if (ubloom > 0.5 && uBloomFirst > 0.5) c += bloom(uv);
  if (utone > 0.5) c = aces(c);
  if (ubloom > 0.5 && uBloomFirst < 0.5) c += bloom(uv);
  return c;
}
float rand(vec2 p) { return fract(sin(dot(p, vec2(12.9898, 78.233))) * 43758.5453); }
void main() {
  vec2 uv = gl_FragCoord.xy / uRes;
  uv.y = 1.0 - uv.y; // screen rows count from the bottom, texture rows from the top
  if (uv.x < uSplit) { // before: the raw frame, simply clipped at white
    gl_FragColor = vec4(clamp(hdr(uv), 0.0, 1.0), 1.0);
    return;
  }
  vec3 c = shade(uv);
  if (uca > 0.5) { // push red outward and blue inward, stronger at the edges
    vec2 d = (uv - 0.5) * 0.015;
    c = vec3(shade(uv + d).r, c.g, shade(uv - d).b);
  }
  if (uvig > 0.5) c *= 1.0 - smoothstep(0.4, 0.85, distance(uv, vec2(0.5)));
  if (ugrain > 0.5) c += (rand(uv + fract(uTime * 0.137)) - 0.5) * 0.12;
  gl_FragColor = vec4(clamp(c, 0.0, 1.0), 1.0);
}`;

function setup() {
  createCanvas(800, 500, WEBGL);
  pixelDensity(1); // one shader pixel per canvas pixel
  scene = createGraphics(width, height);
  scene.pixelDensity(1);
  hud = createGraphics(width, height);
  hud.pixelDensity(1);
  post = createShader(vert, frag);
  noStroke();
  drawHud();
}

function draw() {
  drawScene();
  shader(post);
  post.setUniform('uScene', scene);
  post.setUniform('uRes', [width, height]);
  post.setUniform('uSplit', constrain(mouseX / width, 0, 1));
  post.setUniform('uTime', frameCount);
  post.setUniform('uBloomFirst', bloomFirst ? 1 : 0);
  for (const k in fx) post.setUniform('u' + k, fx[k] ? 1 : 0);
  plane(width, height); // one quad covering the screen = one post pass
  resetShader();
  image(hud, -width / 2, -height / 2); // labels sit on top, untouched by effects
}

function drawScene() {
  const g = scene, t = frameCount * 0.02;
  g.noStroke();
  g.background(16, 18, 36);
  for (let i = 0; i < 9; i++) { // dim buildings: mid tones that should not glow
    g.fill(40 + (i % 3) * 8, 44, 78);
    g.rect(i * 92, 230 + (i % 4) * 35, 80, 300);
    g.fill(255, 230, 160); // warm windows: bright enough to bloom
    for (let j = 0; j < 4; j++) {
      if ((i * 7 + j * 3) % 5 < 2) g.rect(i * 92 + 14 + j * 16, 250 + (i % 4) * 35, 8, 12);
    }
  }
  for (let i = 0; i < 6; i++) { // neon lights drifting across the sky
    g.fill(i % 2 ? color(255, 90, 200) : color(90, 220, 255));
    g.circle(400 + cos(t + i) * 320, 130 + sin(t * 1.3 + i * 2) * 70, 24);
  }
  g.fill(255); // a headlight streak sliding along the street
  g.rect((frameCount * 3) % (width + 200) - 200, 440, 160, 10);
}

function drawHud() {
  const s = (b) => (b ? 'ON' : 'off');
  const lines = ['1  Bloom: ' + s(fx.bloom), '2  Tonemapping (ACES): ' + s(fx.tone),
    '3  Vignette: ' + s(fx.vig), '4  Chromatic aberration: ' + s(fx.ca),
    '5  Film grain: ' + s(fx.grain),
    'O  Order: ' + (bloomFirst ? 'bloom, then tonemap' : 'tonemap, then bloom'),
    'Mouse: left of the cursor is the raw frame'];
  hud.clear();
  hud.noStroke();
  hud.fill(0, 160);
  hud.rect(10, 10, 300, 132, 6);
  hud.fill(255);
  hud.textSize(13);
  lines.forEach((line, i) => hud.text(line, 22, 32 + i * 16));
}

function keyPressed() {
  const map = { 1: 'bloom', 2: 'tone', 3: 'vig', 4: 'ca', 5: 'grain' };
  if (map[key]) fx[map[key]] = !fx[map[key]];
  if (key === 'o' || key === 'O') bloomFirst = !bloomFirst;
  drawHud();
}
Start by switching tonemapping off and watching the windows and neon lights clip to flat white. Then press O and see the halos turn harsh once bloom runs after tonemapping. That ordering problem is the main reason engines run their post effects in a fixed chain. Next time you open a game’s settings menu, test each effect the same way: one setting at a time, in the same scene, checking your FPS as you go.
On this article
- Facts were checked against the sources below before publication.
- Published
Sources (8)
- NVIDIA DLSS 4.5: Dynamic Multi Frame Generation, 6X mode and 2nd-gen transformer Super Resolution (nvidia.com)
- NVIDIA app: DLSS 4.5 Dynamic Multi Frame Generation available now (nvidia.com)
- NVIDIA blog: DLSS, path tracing and G-SYNC Pulsar at CES 2026 (blogs.nvidia.com)
- GamersNexus: Battlefield 1 HBAO vs. SSAO and what ambient occlusion is (gamersnexus.net)
- PC Gamer: The best Fortnite graphics options for competitive play (pcgamer.com)
- GamesRadar: Best Fortnite graphics settings (gamesradar.com)
- Fortnite.gg pro settings (fortnite.gg)
- Dexerto: Neverness to Everness best settings (dexerto.com)