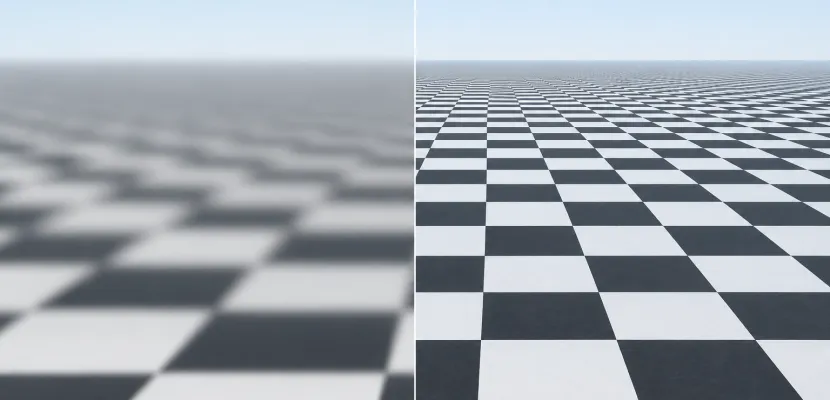
A floor tile that looks sharp under your feet turns to grey mush a few metres away because the GPU reads a smaller, blurrier copy of the texture than that pixel needs. Anisotropic filtering fixes this by taking several texture samples along the stretched direction of each pixel’s footprint, so floors, roads and walls stay sharp at grazing angles. On a modern graphics card it costs very little, which is why 16x is a sensible default for most people.
Key takeaways
- Anisotropic filtering sharpens textures on surfaces you see at a steep angle. Surfaces facing the screen don’t change.
- The 2x to 16x level caps how many samples the GPU can take along a stretched pixel footprint.
- PCWorld says 8x vs 16x is often under 1 FPS on current cards. Intel suggests 4x for a struggling PC.
- AF fixes blur inside surfaces, and anti-aliasing fixes jagged edges.
- In code: where the API offers a query, read the hardware maximum and clamp to it, and check that mipmaps and linear filters are in place.
Fact-checked
We checked these key facts against the sources named, on November 20, 2026:
- A 1024×1024 texture has 11 levels: 1024, 512, 256 and so on down to 1×1 (source: registry.khronos.org)
- It has been Baseline, meaning widely available across browsers, since 7 December 2018 (source: developer.mozilla.org)
- Apple’s Metal accepts sampler anisotropy values from 1 to 16 only, and Direct3D 11 samplers use the same range (source: developer.apple.com)
Anisotropic filtering in one picture
Anisotropic filtering (AF) is a texture filtering method that keeps textures sharp on surfaces that run away from the camera. It takes extra samples along the direction where each pixel’s footprint on the texture is stretched. Without it, distant floor detail blurs. With it, the detail holds up almost to the horizon.
Picture a checkerboard floor running toward a horizon. Near the camera, both trilinear filtering and anisotropic filtering show clean squares. Halfway back, plain trilinear filtering turns the checks into a smeared grey band. With 16x AF the rows stay readable much further out. The demo at the end of this page draws exactly this scene, and you can switch between levels as it runs.
Try it: sweep from 1x to 16x
The live sketch below models the filter inside a fragment shader, so it looks the same on every GPU and browser.
- Start with the mouse at the far left. That is 1x, the same as plain trilinear filtering.
- Move slowly to the right through 2x, 4x and 8x to 16x.
- Press any key to switch to the mip-level colour view, then sweep again.
What to look for (the far edge of the floor)
Watch the middle distance, not the area under the camera. At 1x the checks go soft in both directions long before they get small on screen. Each step up pushes that soft zone further back. The last few rows near the horizon turn grey at every setting. That is correct: more squares fall inside each pixel than the screen can show, so averaging them to grey is the right answer.
In the colour view, each colour is a mip level. At 1x the higher-level colours (blurrier copies) start close to the camera. At 16x the low-level colours reach much further toward the horizon.
Why textures blur at an angle
Textures blur at an angle because the GPU picks one pre-shrunk texture copy (a mip level) that is small enough for the longest side of a pixel’s footprint. On a tilted surface that footprint is long and thin, so the copy that fits its length is far too blurry across its width.
Texels and pixels are not the same size
A texel is one pixel of a texture image. A screen pixel almost never lines up one-to-one with a texel. When one texel covers several screen pixels, that is magnification, and you get smooth or blocky enlargement. When one screen pixel covers many texels, that is minification, and you get the hard case.
Under minification, a single sample lands on one texel and skips the rest. As the camera moves, which texel gets hit keeps changing, and the surface shimmers and crawls. That shimmer is texture aliasing. Mipmaps were invented to stop it.
Mipmaps: the pre-shrunk copies
Mipmapping stores a chain of smaller copies of a texture, each half the width and height of the one before. A 1024×1024 texture has 11 levels: 1024, 512, 256 and so on down to 1×1. The whole chain adds about one third to the texture’s memory.
For each pixel, the GPU estimates how many texels the pixel covers and reads the level where one texel is about one pixel wide. Small, distant geometry reads tiny pre-averaged copies, and the shimmer goes away. Mipmaps are what make textures stable in the distance. They are also what makes them blurry at an angle.
The stretched footprint: where “anisotropic” comes from
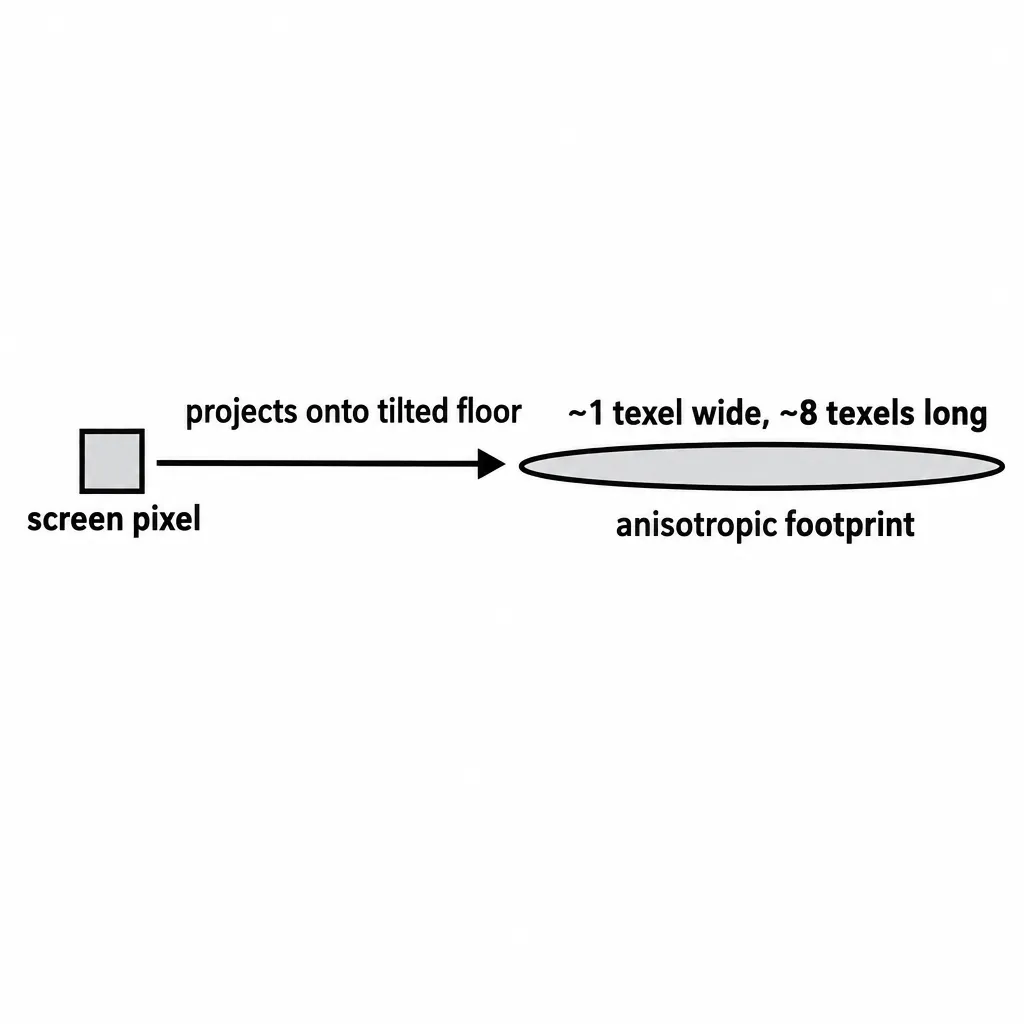
Project one square screen pixel onto a floor that recedes from you, and it lands on the texture as a long, thin shape, roughly an ellipse. It might be 1 texel wide and 8 texels deep.
 Screen pixel                 Its footprint on the floor texture

   +---+                      .------------------------------.
   |   |    --- projects --> (  ~1 texel wide, ~8 texels long  )
   +---+                      '------------------------------'
  square                        long thin ellipse (anisotropic)
“Isotropic” means the same in every direction. Standard mip selection is isotropic: it treats the footprint as a square and sizes that square to the footprint’s longest side. In the example, the long side is 8 texels, so the GPU reads mip level 3, where every texel is 8×8 original texels. Along the depth axis that is the right amount of blur. Across the width it blurs 8 times too much. That extra blur is the mush you see on distant floors.
Anisotropic filtering handles the two axes differently. The Khronos Group’s EXT_texture_filter_anisotropic specification describes a reference method. Measure the footprint’s long side (Pmax) and short side (Pmin). Take N = min(ceil(Pmax / Pmin), max anisotropy) samples spread along the long axis. Read each one from mip level log2(Pmax / N). For the 1×8 footprint at 16x, that is 8 samples from level 0, the full-resolution texture, averaged along the stretch. Real GPUs from NVIDIA, AMD and Intel use their own approximations, but the principle is the same.
What anisotropic scaling means
Anisotropic scaling means scaling something by different amounts along different axes, like stretching an image wider without making it taller. In image editors and layout tools it just means a non-uniform resize that doesn’t keep the aspect ratio.
In texture filtering, the projection from texture to screen is itself an anisotropic scaling. A receding floor shrinks the texture far more along its depth than across its width. The ratio between the two scale factors is the anisotropy ratio. That ratio is exactly what the 2x to 16x setting caps.
Nearest vs bilinear vs trilinear vs anisotropic
Each filter fixes the main flaw of the one before it. Nearest is blocky. Bilinear smooths within one mip level but jumps between levels. Trilinear blends between levels but blurs angled surfaces. Anisotropic filtering removes that angled blur by sampling along the footprint.
| Method | Samples / mip use | Fixes | Leaves behind | Relative cost |
|---|---|---|---|---|
| Nearest (point) | 1 texel, usually no mips | Nothing; keeps hard pixels | Blockiness up close, shimmer at distance | Lowest |
| Bilinear | 4 texels from one mip level | Blocky magnification | Visible bands where the mip level switches | Low |
| Trilinear | 2 bilinear lookups from two adjacent mips, blended | Mip banding | Heavy blur on angled surfaces | Low to moderate |
| Anisotropic (2x to 16x) | Up to N trilinear-style probes along the long axis | Angled-surface blur | Grey averaging very near the horizon (correct); geometry edges untouched | Moderate, scales with the angle |
Bilinear: smoothing within one mip
Bilinear filtering reads the four texels nearest the sample point and blends them by distance. Magnified textures get soft gradients in place of hard blocks. With mipmaps on, bilinear still uses a single mip level per pixel. Where the chosen level changes, you can see a hard line across a floor, called mip banding.
Trilinear: blending between mips
Trilinear filtering does a bilinear lookup in the two nearest mip levels and blends them by the fractional level. The bands disappear into a smooth gradient. In WebGL this is the LINEAR_MIPMAP_LINEAR minification filter. In WebGPU it is mipmapFilter: 'linear'. Trilinear still picks its levels with the isotropic square, so it blurs angled surfaces just as much as bilinear does.
Anisotropic: extra samples along the long axis
Anisotropic filtering keeps trilinear’s blending and adds multiple probes laid out along the long axis of the footprint. Each probe can then come from a sharper mip level. Many guides say the level sets “the maximum angle” AF works at. That is misleading. The surface angle decides how stretched the footprint is. The level decides how many samples the GPU may spend covering that stretch.
When you actually want nearest (pixel art)
For pixel art, low-res fonts and deliberately chunky retro textures, you want nearest filtering for magnification. That keeps every art pixel a crisp square. In three.js that is texture.magFilter = THREE.NearestFilter. In WebGL it is gl.NEAREST. In p5.js WEBGL mode, textureMode handles coordinates, and p5.Texture.setInterpolation(NEAREST, NEAREST) controls filtering.
A pixel-art floor seen at an angle still suffers from minification, though. A common compromise is nearest magnification with a mipmapped linear minification filter. That keeps the crisp look up close and stops shimmer far away.
What 2x, 4x, 8x and 16x actually mean
The number is the maximum anisotropy ratio, so it works as a sample budget. At 4x the GPU can cover a footprint up to 4 times longer than it is wide at full sharpness. Longer footprints fall back to a blurrier mip. The GPU takes more samples on surfaces viewed at oblique angles.
Here is the 1×8 texel footprint from earlier, run through the Khronos reference formula at each level:
| AF level | Samples along long axis | Mip level read | What you see on that pixel |
|---|---|---|---|
| 1x (trilinear) | 1 | 3 | 8× too blurry across the width |
| 2x | 2 | 2 | 4× too blurry |
| 4x | 4 | 1 | 2× too blurry |
| 8x | 8 | 0 | Full sharpness |
| 16x | 8 (only 8 needed) | 0 | Identical to 8x |
Now take an even steeper footprint, 1×32 texels, the kind you get close to the horizon. At 8x it reads level 2. At 16x it reads level 1. So 16x adds extra sharpness on surfaces seen at steep oblique angles.
Sixteen is the usual ceiling because the APIs set it there. Apple’s Metal accepts sampler anisotropy values from 1 to 16 only, and Direct3D 11 samplers use the same range. In Vulkan, the limit is whatever the device reports as maxSamplerAnisotropy, which is 16 on typical desktop GPUs.
Did you know?
The 16x cap isn’t arbitrary. According to WebKit’s bug tracker, Apple’s Metal accepts only values from 1 to 16, so WebKit clamps any larger WebGPU maxAnisotropy value to 16 and doesn’t throw an error.
Is 16x better than 8x?
Yes, but only slightly, and mostly on steeply angled surfaces. Intel’s gaming guide says the improvement from 8x to 16x can be slight. PCWorld reports the frame-rate difference is often under one frame per second on current graphics cards. If you play on a modern GPU, use 16x. If you’re squeezing out every frame on weak hardware, 8x loses almost nothing.
One forum question asks: “Is the difference between 8x and 16x so minor it isn’t worth the performance loss? Is 4x the sweet spot?” On current hardware, both the visual difference and the cost are tiny, so neither choice really matters. On an integrated GPU, 4x is a good place to start benchmarking.
Is 2x anisotropic good enough?
2x is a big step up from 1x, because it halves the blur on moderately angled surfaces. It is still visibly soft on long floors and roads. Use it only when a benchmark shows a real gain over 4x on your machine. On most systems that gain won’t be there.
Does anisotropic filtering affect FPS?
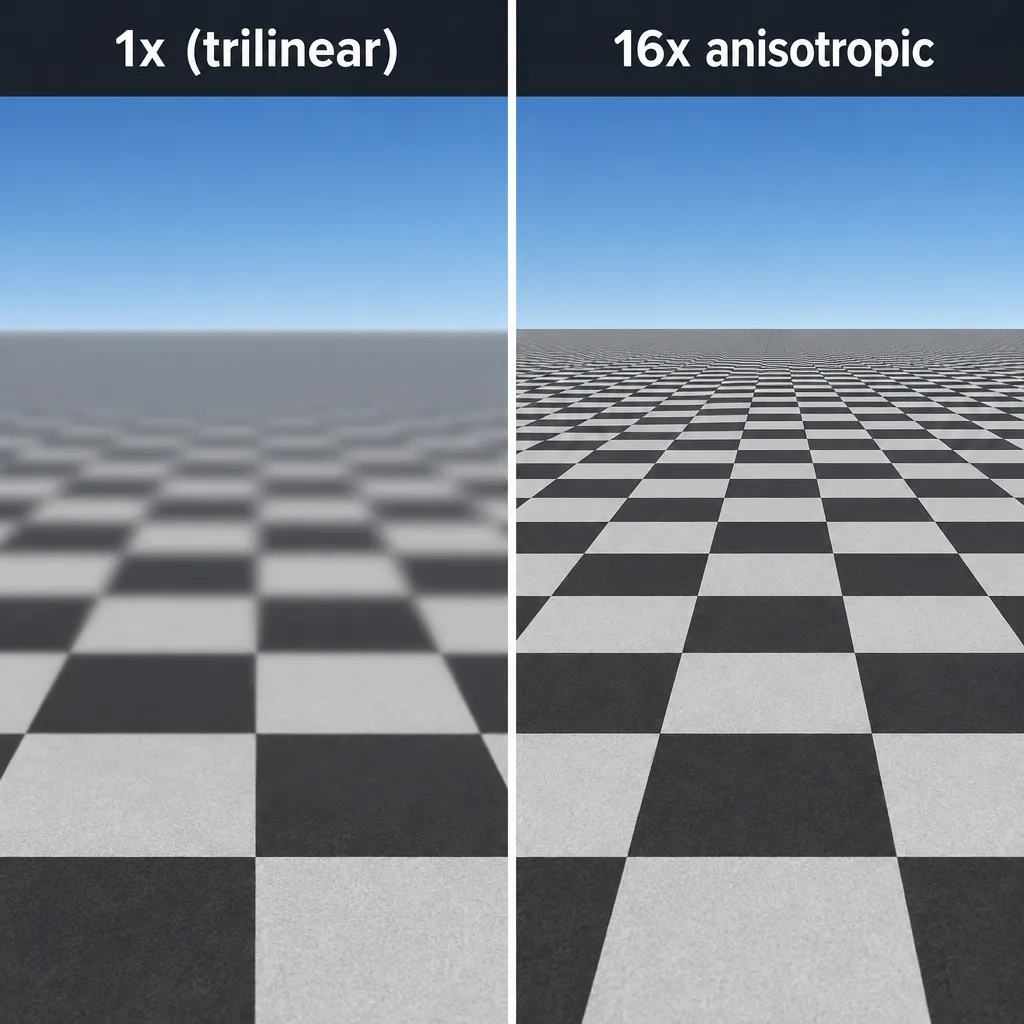
Anisotropic filtering does affect FPS, but on modern GPUs the cost is usually small, often under 1 FPS between 8x and 16x. The large hits in old benchmarks came from mid-2000s hardware. Today AF mostly costs frames on weak integrated graphics, in texture-heavy scenes, or in isolated outlier cases.
| Source | Hardware / game | Comparison | Measured cost | Period |
|---|---|---|---|---|
| Beyond3D | Radeon X800, 3DMark03 GT2 | 1x vs 16x | 17 to 18% lower frame rate; none in a pure pixel-shader test | Mid-2000s |
| PC Gamer | BioShock Infinite | Bilinear vs 16x AF | About 6 FPS lower average, called small for the gain | BioShock Infinite era |
| Warframe forums (one user) | GTX 1080, Warframe | Off vs 16x | 152 to 105 FPS, about 31% | Single community report |
| PCWorld | Current graphics cards | 8x vs 16x | Often under 1 FPS | Current guide |
| Intel | General PC gaming | 8x vs 16x | Slight visual gain at relatively low cost | Current guide |
Modern GPUs vs older hardware
The Beyond3D result shows where AF’s reputation came from. In the Radeon X800 era, extra texture samples competed directly with everything else the card was doing. Even then the cost depended on the workload: the pure pixel-shader test showed no penalty, because the bottleneck sat elsewhere. Modern GPUs have far more texture units and memory bandwidth, and much of a modern frame’s time goes to shading, lighting and post-processing. PC Gamer’s roughly 6 FPS for full 16x was already small, and PCWorld’s current figures are smaller still.
When AF can still cost frames
AF costs more when texture sampling is the bottleneck. That happens with many large textures per material, on integrated GPUs that share system memory, and in scenes full of long grazing surfaces such as terrain, roads and corridors.
The Warframe report (“152 to 105 FPS with 16x on a GTX 1080, why?”) shows a 31% drop, which is far outside the usual range. A single report can’t separate AF from driver overrides, scene differences or other settings changing at the same time. If you see something similar, test the same scene twice with only AF changed.
The opposite case is common too. If a game or simulator is held back by its CPU or main thread, lowering AF usually changes nothing, as FlyAwaySimulation’s flight-sim guidance notes. To the reader asking “Will lowering anisotropic filtering help FPS in a flight sim if I’m CPU limited?”: almost certainly not. Leave it high.
Studio tip
On any reasonably modern GPU, set AF to 16x in the game and leave it. If you need more frames, drop to 8x or 4x before you touch other settings, and benchmark the same scene so you know the change is real.
On or off for FPS?
Leave it on. Turning AF off saves very little on current hardware and makes every floor and road blur. The only real case for 1x or 2x is an old or integrated GPU where a benchmark shows a gain you can measure.
Anisotropic filtering vs anti-aliasing
They fix different problems, so one can’t replace the other. AF sharpens texture detail inside a surface viewed at an angle. Anti-aliasing smooths the jagged, crawling edges of geometry and the shimmer of fine detail. AF is usually the cheaper of the two.
| Anisotropic filtering | Anti-aliasing (MSAA, FXAA, TAA and others) | |
|---|---|---|
| Problem it targets | Blurry textures on angled surfaces | Jagged edges, stair-stepping, crawling shimmer |
| Where it works | Inside the texture sampler | Across the rendered image or geometry edges |
| Typical cost | Low on modern GPUs | Low (FXAA) to high (high-sample MSAA, supersampling) |
| Side effects | None worth noting | Some methods soften the whole image or ghost in motion |
If you have to choose on weak hardware, keep AF and pick a cheap anti-aliasing mode. Blur on every floor is visible all the time, and a cheap post-process AA handles most edge jaggies.
Recommended settings by game and hardware
Use 16x on modern GPUs, 4x on struggling PCs, and leave AF high in CPU-bound games, where lowering it gains nothing. Guides for individual games disagree more than the hardware does, so treat their numbers as starting points for your own benchmark.
| Situation | Suggested level | Why | Source |
|---|---|---|---|
| Modern discrete GPU, any game | 16x | Visible sharpness, near-zero cost | PCWorld, Intel |
| Struggling or older PC | 4x | Keeps most of the gain at lower cost | Intel |
| CPU-bound esports or flight sim | Leave high (8x to 16x) | Lowering AF won’t raise FPS | FlyAwaySimulation |
| Valorant, typical mid-range PC | 4x | Common pick across guides | Sportskeeda, esports.net |
| Genshin Impact on PC | 16x; 1x on very low-end PCs | Low cost; 1x only to save every frame | esports.net, egg.network |
| Pixel-art textures in your own project | Nearest magnification, AF optional | Keeps art pixels crisp | Filtering behaviour above |
Valorant
Riot Games puts the option under Video > Graphics Quality, with values from 1x to 16x. Advice runs the whole range. Bo3.gg suggests 1x or 2x for higher FPS. Sportskeeda calls 4x the best value for most setups, with 8x or 16x fine on high-end PCs. Esports.net’s 2026 guide also lists 4x. Prosettings says to turn it off because it gives no competitive advantage. PC Gamer used 8x in its Medium preset.
So does AF give any competitive advantage in Valorant, or is it just eye candy? It’s eye candy. AF sharpens floor and wall textures. Enemy visibility depends on character models, outlines, resolution and frame rate. Valorant often runs at very high frame rates where the CPU sets the limit, so AF’s cost there tends to be negligible. Use 4x as a safe default. Use 16x if your frame rate stays well above your monitor’s refresh rate.
Genshin Impact
HoYoverse’s Genshin Impact has an anisotropic filtering option in its PC graphics settings. Esports.net and similar guides recommend 16x as a clarity gain with no significant performance cost. Budget-PC guides such as egg.network suggest 1x on very low-end machines, where it is close to free FPS. The open world is full of long ground surfaces, so the difference between 1x and 16x is easy to see, and you should drop it only as a last resort.
Driver override vs in-game setting
The NVIDIA Control Panel’s anisotropic filtering setting has three choices: let the application control it, turn it off, or force a fixed level. A forced level overrides the game’s own texture filtering. AMD Software: Adrenalin Edition has a similar anisotropic filtering control in its graphics settings.
Use the in-game setting first. It’s per-game, the developer has tested it, and it can’t conflict with anything else. A driver override is useful for older games with no AF option or a low cap. NVIDIA’s separate “Texture filtering – Quality” setting doesn’t change the AF level. It controls the driver’s sampling optimisations.
Studio tip
Use either the in-game AF setting or the driver override, not both. Leave the driver on application-controlled unless a game lacks the option, so you always know which value is in effect.
Turn it on in your own code
Every major graphics API sets AF per sampler or per texture. The pattern is always the same: stay within the supported maximum (queried where the API offers a query), and make sure mipmaps exist and the filters are linear. The table sums up the property, the query and the most common trap for each API.
| API / library | Property | Query max with | Default | Gotcha |
|---|---|---|---|---|
| three.js | texture.anisotropy |
renderer.capabilities.getMaxAnisotropy() |
1 | Set texture.needsUpdate = true if you change it after first upload |
| WebGL 1 / 2 | TEXTURE_MAX_ANISOTROPY_EXT (0x84FE) |
getParameter(MAX_TEXTURE_MAX_ANISOTROPY_EXT) (0x84FF) |
1.0 | Extension may be missing; mipmaps must exist |
| WebGPU | GPUSamplerDescriptor.maxAnisotropy |
No query; the spec allows integers 1 to 16 | 1 | All three filters must be 'linear' when above 1 |
| Vulkan | anisotropyEnable + maxAnisotropy in VkSamplerCreateInfo |
VkPhysicalDeviceLimits::maxSamplerAnisotropy |
None (you fill the struct) | samplerAnisotropy feature must be enabled on the device |
three.js: texture.anisotropy
In three.js, set texture.anisotropy to a value up to renderer.capabilities.getMaxAnisotropy(). That method replaced the older renderer.getMaxAnisotropy() and returns the GPU’s MAX_TEXTURE_MAX_ANISOTROPY_EXT value. Textures default to a mipmapped trilinear minification filter, so AF works as soon as you set it.
import * as THREE from 'three';

const renderer = new THREE.WebGLRenderer({ antialias: true });
const maxAniso = renderer.capabilities.getMaxAnisotropy(); // e.g. 16 const floorTex = new THREE.TextureLoader().load('floor.jpg');
floorTex.wrapS = floorTex.wrapT = THREE.RepeatWrapping;
floorTex.repeat.set(40, 40);
floorTex.colorSpace = THREE.SRGBColorSpace;
floorTex.anisotropy = Math.min(16, maxAniso); // clamp to the hardware limit const floor = new THREE.Mesh(
  new THREE.PlaneGeometry(200, 200),
  new THREE.MeshStandardMaterial({ map: floorTex })
);
floor.rotation.x = -Math.PI / 2; // lay it flat so it recedes from the camera
Studio tip
Read getMaxAnisotropy() once and apply it only to textures you see at an angle: floors, terrain, roads, long walls. UI quads and sprites that face the camera gain nothing.
WebGL: EXT_texture_filter_anisotropic
In raw WebGL you use the EXT_texture_filter_anisotropic extension from the Khronos registry. It has been Baseline, meaning widely available across browsers, since 7 December 2018. The extension adds no WebGL-specific behaviour changes. getParameter returns the maximum as a float, and MDN’s example also tries the old MOZ_ and WEBKIT_ prefixed names as fallbacks.
const ext =
  gl.getExtension('EXT_texture_filter_anisotropic') ||
  gl.getExtension('MOZ_EXT_texture_filter_anisotropic') ||
  gl.getExtension('WEBKIT_EXT_texture_filter_anisotropic');

gl.bindTexture(gl.TEXTURE_2D, tex);
gl.texImage2D(gl.TEXTURE_2D, 0, gl.RGBA, gl.RGBA, gl.UNSIGNED_BYTE, image);
gl.generateMipmap(gl.TEXTURE_2D); // AF needs mipmaps to work with
gl.texParameteri(gl.TEXTURE_2D, gl.TEXTURE_MIN_FILTER, gl.LINEAR_MIPMAP_LINEAR);
gl.texParameteri(gl.TEXTURE_2D, gl.TEXTURE_MAG_FILTER, gl.LINEAR);

if (ext) {
  // MAX_TEXTURE_MAX_ANISOTROPY_EXT is 0x84FF, TEXTURE_MAX_ANISOTROPY_EXT is 0x84FE
  const max = gl.getParameter(ext.MAX_TEXTURE_MAX_ANISOTROPY_EXT);
  gl.texParameterf(gl.TEXTURE_2D, ext.TEXTURE_MAX_ANISOTROPY_EXT, Math.min(16, max));
}
Heads up
In WebGL 1, non-power-of-two textures can’t have mipmaps, and generateMipmap fails on them. Resize to 512, 1024 or 2048, or use WebGL 2, so mipmaps can be generated and AF has a mip chain to work with.
WebGPU: maxAnisotropy and the all-linear rule
In WebGPU, set maxAnisotropy on the GPUSamplerDescriptor you pass to device.createSampler(). According to MDN, it defaults to 1. The value must be an integer from 1 to 16, and a value above what the device supports may be rejected. When it is above 1, magFilter, minFilter and mipmapFilter must all be 'linear'. If they aren’t, sampler creation fails validation in Chromium’s Dawn and in other implementations.
const sampler = device.createSampler({
  addressModeU: 'repeat',
  addressModeV: 'repeat',
  magFilter: 'linear',
  minFilter: 'linear',
  mipmapFilter: 'linear', // all three must be 'linear' when maxAnisotropy > 1
  maxAnisotropy: 16,      // integer from 1 to 16
});
WebGPU has no built-in generateMipmap. You create the texture with a mipLevelCount and fill the levels yourself, usually with a small render or compute pass. A texture with only one level gives AF nothing to work with.
Did you know?
According to MDN’s WebGPU documentation, a sampler with maxAnisotropy: 16 and the default ‘nearest’ filters is a validation error. The anisotropy request doesn’t get ignored: the sampler is never created at all.
Vulkan: samplerAnisotropy and maxSamplerAnisotropy
In Vulkan, AF is a device feature you enable first and then use per sampler. The Vulkan specification says anisotropyEnable must be VK_FALSE unless the samplerAnisotropy feature is enabled. maxAnisotropy must be between 1.0 and VkPhysicalDeviceLimits::maxSamplerAnisotropy. AF can’t be combined with unnormalizedCoordinates.
\#include <math.h>
\#include <vulkan/vulkan.h>

VkPhysicalDeviceFeatures supported;
vkGetPhysicalDeviceFeatures(physicalDevice, &supported);
VkPhysicalDeviceProperties props;
vkGetPhysicalDeviceProperties(physicalDevice, &props);

// When creating the device: request the feature only if it is supported
VkPhysicalDeviceFeatures enabled = {0};
enabled.samplerAnisotropy = supported.samplerAnisotropy;
// deviceCreateInfo.pEnabledFeatures = &enabled;

VkSamplerCreateInfo info = { VK_STRUCTURE_TYPE_SAMPLER_CREATE_INFO };
info.magFilter = VK_FILTER_LINEAR;
info.minFilter = VK_FILTER_LINEAR;
info.mipmapMode = VK_SAMPLER_MIPMAP_MODE_LINEAR;
info.addressModeU = VK_SAMPLER_ADDRESS_MODE_REPEAT;
info.addressModeV = VK_SAMPLER_ADDRESS_MODE_REPEAT;
info.addressModeW = VK_SAMPLER_ADDRESS_MODE_REPEAT;
info.anisotropyEnable = enabled.samplerAnisotropy ? VK_TRUE : VK_FALSE;
info.maxAnisotropy = enabled.samplerAnisotropy
    ? fminf(16.0f, props.limits.maxSamplerAnisotropy) : 1.0f;
info.minLod = 0.0f;
info.maxLod = VK_LOD_CLAMP_NONE;
info.unnormalizedCoordinates = VK_FALSE; // AF is not allowed with unnormalized coords

VkSampler sampler;
vkCreateSampler(device, &info, NULL, &sampler);
I set anisotropy and nothing changed: a debugging checklist
If AF seems to do nothing, the cause is almost always one of these: no mipmaps, filters that aren’t linear, a device limit that clamps the value to 1, or a surface that isn’t actually at an angle. Sometimes the problem is aliasing, not blur. Work through the list in order.
- Mipmaps are missing or failed. No mip chain means no blurry levels for AF to improve on. Check WebGL 1 power-of-two rules, WebGPU’s
mipLevelCount, andgenerateMipmapsin three.js. - Filters aren’t linear. A
NEARESTminification filter, or WebGPU’s nearest defaults, cancels or blocks AF. - The value was clamped. Log
getMaxAnisotropy()orMAX_TEXTURE_MAX_ANISOTROPY_EXT. Some software renderers and virtual machines report 1. - The change never reached the GPU. In three.js, set
anisotropybefore the first render or flagneedsUpdate. Also check that the texture you edited is the one the material actually uses. - A framework or XR path overrides it. For “texture anisotropy has no effect in WebXR”, check which renderer and material path the XR session uses. Also check the session’s framebuffer scale: a low-resolution eye buffer blurs everything, and AF can’t fix that.
- The surface isn’t angled. “My plane with an image texture blurs when I rotate it” is AF territory only if the plane tilts away from the camera. A plane facing the camera that looks soft is being magnified, or is drawn at a lower resolution than the screen.
- The real problem is aliasing. Shimmer and crawling are aliasing, not blur. That calls for mipmaps, anti-aliasing or a texture with less high-frequency detail.
- The distance is just extreme. For “blurred textures at a distance: setting anisotropy levels doesn’t affect it at all”: near the horizon even 16x runs out of budget, and detail smaller than a pixel correctly averages to flat colour.
To see what the sampler is doing, colour each pixel by the mip level it reads. This fragment shader works in a three.js ShaderMaterial or any WebGL 2 pipeline that passes vUv:
// Colours each pixel by the mip level the sampler would read
uniform vec2 uTexSize;   // texture size in texels times repeat, e.g. vec2(1024.0 * 40.0)
varying vec2 vUv;

void main() {
  vec2 t = vUv * uTexSize;                  // position in texel units
  float px = length(dFdx(t));               // footprint along screen x
  float py = length(dFdy(t));               // footprint along screen y
  float pMax = max(px, py);
  float pMin = max(min(px, py), 1e-6);
  float isoLod = log2(max(pMax, 1.0));                          // trilinear's choice
  float afLod = log2(max(pMax / min(ceil(pMax / pMin), 16.0), 1.0)); // 16x AF's choice
  float lod = afLod;                         // swap in isoLod to compare
  vec3 c = 0.5 + 0.5 * cos(6.2831 * (lod / 8.0 + vec3(0.0, 0.33, 0.67)));
  gl_FragColor = vec4(c, 1.0);
}
If both versions show the same colours across your floor, the footprint isn’t stretched and AF has nothing to do. If they differ but the rendered texture doesn’t, the AF setting isn’t reaching the sampler.
Creative coding uses
AF matters in creative coding whenever your piece has a ground plane or text that recedes into depth. That covers infinite grids, horizon typography, scrolling terrain and data landscapes. Any time your camera sits low and looks along a surface, turn it on.
- Infinite grid floors. Synthwave-style grids and studio floors fall apart into moiré and mush without mipmaps and AF. With a procedural grid in a shader you filter analytically instead: widen the line with
fwidth()so it fades smoothly with distance. - Horizon text and scrolling ground planes. Text on a tilted plane, such as opening-crawl typography or words painted on a road, is the clearest case of all. Thin letter strokes vanish at 1x and hold up at 16x.
- Low cameras. If you aim the camera with a lookAt matrix close to the ground, the angle gets steeper and AF matters more. Keep depth testing on so the floor sorts correctly against objects standing on it.
- Shader-sampled textures. A
texture()call in your own GLSL uses the sampler’s AF setting automatically. Calls with a manual LOD, liketextureLod, skip the derivative-based selection AF depends on. - Pixel-art worlds. Use nearest magnification for the look, and keep mipmapped minification so the distance doesn’t sparkle.
Mini exercise for a workshop: build a three.js scene with a 200×200 plane and a fine repeating text texture, and set the camera 1 unit above it. Render it with anisotropy = 1, then with the hardware maximum, and screenshot both. Then lower the camera to 0.3 units and repeat. The gap between the two renders grows as the camera drops, which shows that AF depends on the footprint’s stretch, not on some fixed angle.
FAQ
Does anisotropic filtering affect FPS?
Yes, slightly. On current graphics cards PCWorld reports that 8x vs 16x is often under 1 FPS, and PC Gamer measured about 6 FPS from bilinear to 16x in BioShock Infinite. The 17 to 18% hits you’ll see quoted come from mid-2000s Radeon X800-era tests.
Is 16x anisotropic better than 8x?
It is sharper mainly on steeply angled surfaces, and Intel calls the gain slight. On modern hardware the cost is near zero, so use 16x. 8x is a fine choice if you want a small safety margin.
Is anisotropic 2x good?
It’s much better than 1x but still soft on long floors and roads. Use 4x or more unless a benchmark on your own PC shows 2x is clearly faster.
What is anisotropic scaling?
It means scaling by different amounts along different axes. A receding floor shrinks the texture far more in depth than in width, and the ratio between the two is what AF compensates for.
Should anisotropic filtering be on or off for FPS?
On. Turning it off saves little on modern GPUs and blurs every angled surface. In CPU-bound games, turning it off saves nothing at all.
What is the difference between anisotropic filtering and trilinear filtering?
Trilinear blends two mip levels picked with a square footprint, so it blurs angled surfaces. Anisotropic filtering adds samples along the stretched axis so it can read sharper mip levels.
Anisotropic filtering vs anti-aliasing: which matters more?
They fix different things: AF fixes texture blur, and anti-aliasing fixes jagged edges. AF is usually cheaper, so keep it high and adjust anti-aliasing to fit your performance budget.
What anisotropic filtering should I use in Valorant?
Guides disagree, from off (Prosettings) and 1x to 2x (Bo3.gg) to 4x (Sportskeeda, esports.net) and 8x (PC Gamer’s Medium preset). It gives no competitive edge, so 4x is a safe default. Use 16x if your frame rate has plenty of headroom.
What anisotropic filtering setting is best for Genshin Impact?
On PC, guides commonly recommend 16x because the visual gain is large and the cost is small. Drop to 1x only on very low-end machines.
Should I set anisotropic filtering in the NVIDIA Control Panel or in the game?
Set it in the game and leave the NVIDIA Control Panel or AMD Software: Adrenalin Edition on application-controlled. Use a driver override only for games that lack the option. Don’t set both.
Try it live
This p5.js 1.x sketch ray-casts an endless checkerboard floor in a fragment shader. For each pixel it measures the footprint on the texture and filters it the way the Khronos reference method describes: N samples along the long axis, each from a blurrier or sharper mip-sized box. Move the mouse left to right for 1x to 16x, and press any key for the mip-level colour view.
// Anisotropic filtering, modelled in a shader so it looks the same on every GPU.
// Move the mouse left to right to pick 1x, 2x, 4x, 8x or 16x.
// Press any key to switch between the floor texture and the mip-level colours.

let floorShader;
let hud;
let showMips = false;
const levels = [1, 2, 4, 8, 16];

const vert = `
precision highp float;
attribute vec3 aPosition;
void main() {
  // Stretch p5's unit rectangle over the whole canvas
  vec4 p = vec4(aPosition, 1.0);
  p.xy = p.xy * 2.0 - 1.0;
  gl_Position = p;
}`;

const frag = `
precision highp float;
uniform vec2 uRes;
uniform float uLevel;
uniform float uMips;
uniform float uTime;
uniform sampler2D uHud;

// Where does the view ray through this pixel hit the floor? Returns texture coordinates.
vec2 floorUV(vec2 px) {
  vec2 p = (px - 0.5 * uRes) / uRes.y;
  vec3 dir = vec3(p.x, p.y - 0.18, 1.0);   // horizon sits a little above centre
  float t = 1.0 / max(-dir.y, 1e-4);       // camera is 1 unit above the floor
  return dir.xz * t * 4.0 + vec2(0.0, uTime * 0.5);
}

// Checkerboard averaged over a box of width w (stands in for one mip level)
float checker(vec2 uv, vec2 w) {
  vec2 a = abs(fract((uv - 0.5 * w) * 0.5) - 0.5);
  vec2 b = abs(fract((uv + 0.5 * w) * 0.5) - 0.5);
  vec2 i = 2.0 * (a - b) / w;
  return 0.5 - 0.5 * i.x * i.y;
}

void main() {
  vec2 px = gl_FragCoord.xy;
  vec3 col = vec3(0.55, 0.7, 0.9);         // sky
  if ((px.y - 0.5 * uRes.y) / uRes.y < 0.17) {
    // Footprint of this pixel on the texture: two edge vectors
    vec2 uv = floorUV(px);
    vec2 dx = floorUV(px + vec2(1.0, 0.0)) - uv;
    vec2 dy = floorUV(px + vec2(0.0, 1.0)) - uv;
    float la = length(dx);
    float lb = length(dy);
    float major = max(la, lb);
    float minor = max(min(la, lb), 1e-5);
    vec2 axis = la > lb ? dx : dy;
    // Samples = stretch ratio, capped by the AF level (1x means plain trilinear)
    float n = min(ceil(major / minor), uLevel);
    vec2 w = vec2(max(major / n, 1e-5));
    float sum = 0.0;
    for (int i = 0; i < 16; i++) {
      if (float(i) >= n) break;
      vec2 offset = axis * ((float(i) + 0.5) / n - 0.5);
      sum += checker(uv + offset, w);
    }
    float c = sum / n;
    col = mix(vec3(0.12, 0.1, 0.15), vec3(0.95, 0.9, 0.8), c);
    if (uMips > 0.5) {
      // Mip level this box would read if each square were 64 texels wide
      float lod = log2(max(w.x * 64.0, 1.0));
      col = 0.5 + 0.5 * cos(6.2831 * (lod / 7.0 + vec3(0.0, 0.33, 0.67)));
      col *= 0.6 + 0.4 * c;
    }
  }
  // Draw the label in the top-left corner
  vec2 tl = vec2(px.x, uRes.y - px.y);
  if (tl.x < 240.0 && tl.y < 44.0) {
    vec4 h = texture2D(uHud, tl / vec2(240.0, 44.0));
    col = mix(col, h.rgb, h.a);
  }
  gl_FragColor = vec4(col, 1.0);
}`;

function setup() {
  createCanvas(800, 500, WEBGL);
  pixelDensity(1);
  noStroke();
  floorShader = createShader(vert, frag);
  hud = createGraphics(240, 44);
}

function draw() {
  // Five bands across the canvas pick the AF level
  const idx = constrain(floor(map(mouseX, 0, width, 0, 5)), 0, 4);
  const level = levels[idx];

  // Redraw the small label texture
  hud.clear();
  hud.noStroke();
  hud.fill(0, 170);
  hud.rect(0, 0, 240, 44, 6);
  hud.fill(255);
  hud.textSize(16);
  hud.text('AF ' + level + 'x' + (showMips ? '   mip colours' : ''), 12, 27);

  shader(floorShader);
  floorShader.setUniform('uRes', [width, height]);
  floorShader.setUniform('uLevel', level);
  floorShader.setUniform('uMips', showMips ? 1 : 0);
  floorShader.setUniform('uTime', millis() / 1000);
  floorShader.setUniform('uHud', hud);
  rect(0, 0, width, height);
}

function keyPressed() {
  showMips = !showMips;
}
For a next step, change 1.0 / max(-dir.y, 1e-4) so the camera sits lower, at 0.4 units, and sweep the levels again. The floor gets steeper and the 8x-to-16x step becomes visible, which matches the 1×32 footprint example in the levels table.
On this article
- Facts were checked against the sources below before publication.
- Published
Sources (8)
- GPUDevice: createSampler() method - MDN (developer.mozilla.org)
- WebKit Bug 238063: WebGPU maxAnisotropy clamping (bugs.webkit.org)
- Khronos WebGL extension registry: EXT_texture_filter_anisotropic (registry.khronos.org)
- EXT_texture_filter_anisotropic - MDN (developer.mozilla.org)
- Web features explorer: EXT_texture_filter_anisotropic Baseline status (web-platform-dx.github.io)
- VkSamplerCreateInfo - Vulkan specification (docs.vulkan.org)
- three.js forum: How to increase maxAnisotropy (discourse.threejs.org)
- Intel: What is anisotropic filtering? (intel.com)