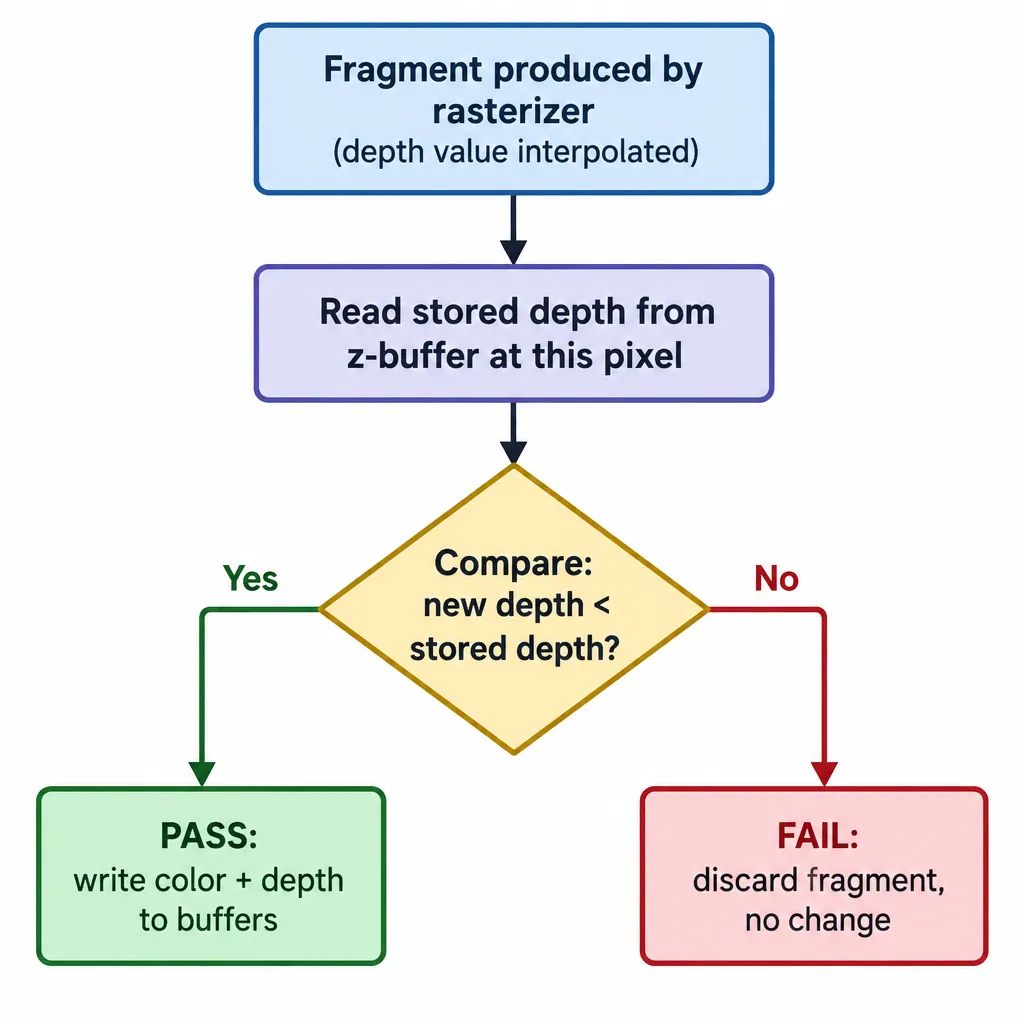
A fresh WebGL context draws in painter’s order: the last thing you draw lands on top, because depth testing stays off until you call gl.enable(gl.DEPTH_TEST). Depth testing is the per-fragment check that compares each new pixel’s distance from the camera against the value already stored in the depth buffer (z-buffer). If the new fragment passes, its color and depth are written. If it fails, it is discarded. This guide shows how to turn it on, control it and debug it in OpenGL, WebGL, WebGPU, three.js, p5.js, Processing and TouchDesigner, and how to use it on purpose in your art.
Key takeaways
- The depth buffer holds one value per pixel, cleared to 1.0 (far), and each fragment is tested against it.
- It takes three steps: request a depth buffer, enable the test, then clear depth every frame.
- The depth test and depth writes are separate switches. Particles, glows and transparency usually need test on, writes off.
- Flickering surfaces (z-fighting) usually come from a near plane that is too close. Move it out first, then consider reverse-Z.
- Using
discardor writinggl_FragDepthcan switch off early-Z and slow heavy shaders.
Fact-checked
We checked these key facts against the sources named, on November 09, 2026:
- Chrome 120 made
depthCompareanddepthWriteEnabledoptional only when they are not used (source: caniuse.com) - In three.js, reverse-Z arrived for
WebGLRendererin pull request #29445, merged on 21 September 2024 and built onEXT_clip_control(source: mygithub.libinneed.workers.dev) - For those, order-independent techniques such as weighted blended OIT (McGuire and Bavoil, 2013) trade exactness for freedom from sorting (source: jcgt.org)
- The depth buffer is normally cleared to 1.0, the farthest possible value, so the first fragment to land on any pixel always passes a “less than” test (source: registry.khronos.org)
- Most z-fighting at long range comes from a near plane set too close, not from the far plane. A perspective projection stores depth as roughly 1/z, not z (source: en.wikipedia.org)
What depth testing is, in one picture
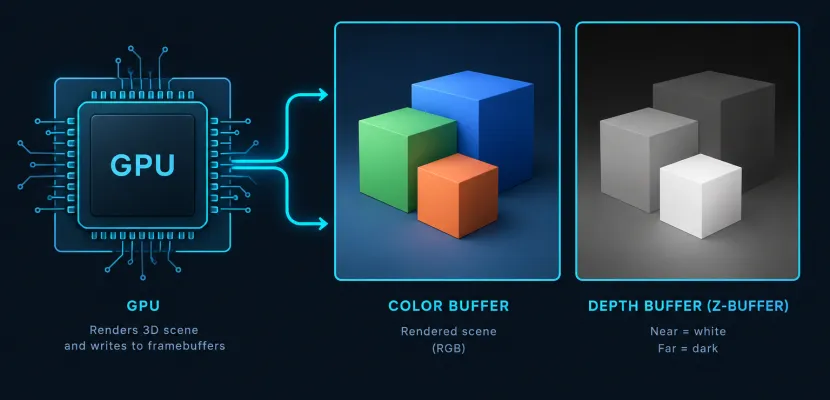
The depth buffer is a hidden image the same size as your canvas that stores one distance per pixel instead of a color. Before a fragment is drawn, the GPU compares its depth with the stored value and keeps whichever is closer. That one comparison is why 3D scenes look solid even when you draw objects in a random order.
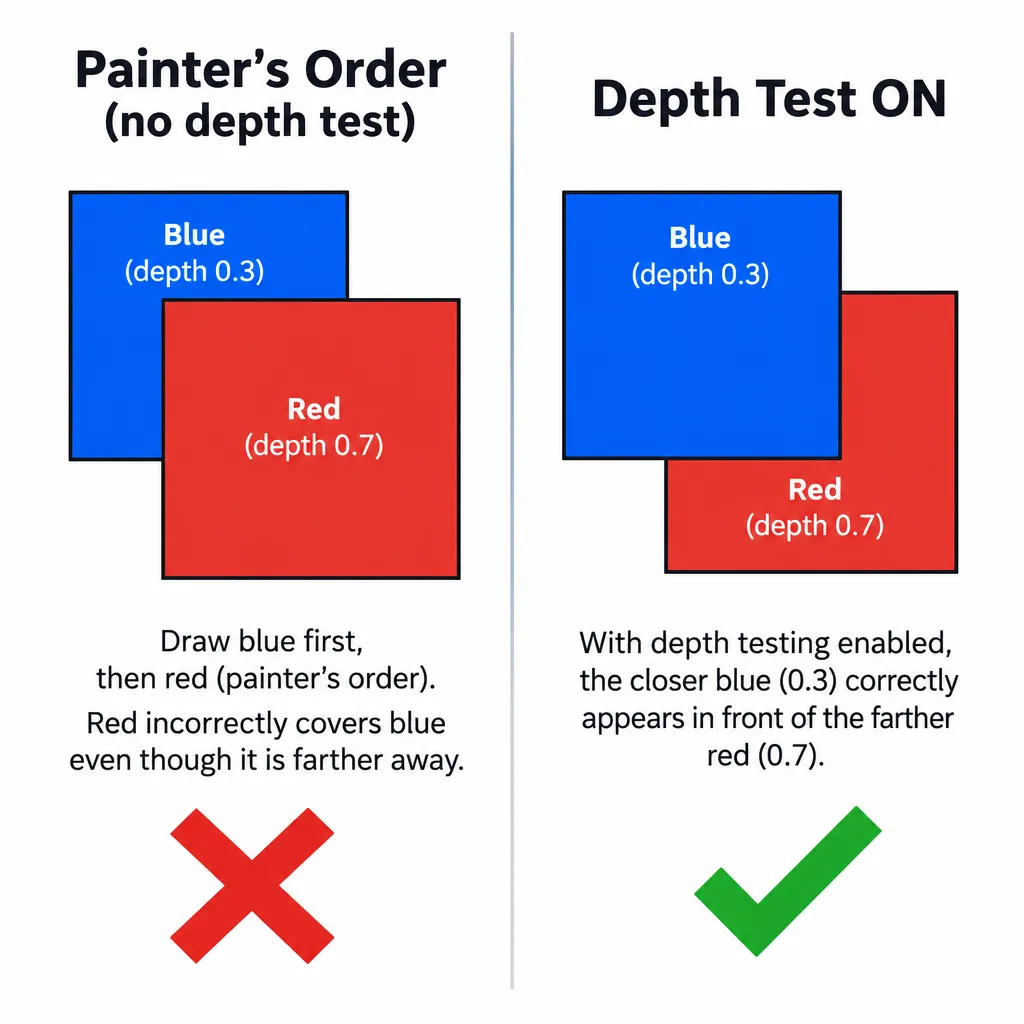
Picture two overlapping squares. The blue one sits at depth 0.3, the red one at depth 0.7. You draw red first, then blue. Without depth testing, blue simply paints over red, which happens to be correct. Now reverse the order. Red is drawn second, so in painter’s order it covers blue, which is wrong. With depth testing on, each red fragment at 0.7 is compared with the 0.3 already stored where blue was drawn. It fails, gets discarded, and blue stays in front.
One quick note on the phrase: if you searched for “in depth testing” meaning thorough software QA, this page is about something else. It covers the graphics technique that decides which surfaces are visible.
The depth buffer vs the color buffer
The color buffer stores what you see. The depth buffer stores how far away each visible pixel is. They share the same width and height, and in the default setup depth runs from 0.0 at the near plane to 1.0 at the far plane.
Clearing matters. The depth buffer is normally cleared to 1.0, the farthest possible value, so the first fragment to land on any pixel always passes a “less than” test. OpenGL’s glClearDepth defaults to 1.0, and WebGL’s gl.clearDepth does too.
What happens to each fragment: test, pass/write, fail/discard
Everything in depth testing comes down to one comparison per fragment, run after rasterization and usually around the fragment shader:
- The rasterizer produces a fragment with an interpolated depth value.
- The GPU reads the stored depth at that pixel.
- It compares the two using the current depth function (by default, “is the new value less than the stored one?”).
- If the test passes, the color is blended into the color buffer, and the new depth is written if depth writes are on.
- If the test fails, the fragment is discarded. Neither color nor depth changes.
Why draw order stops mattering (for opaque objects)
For solid, opaque geometry, the depth test makes the final image independent of draw order. The closest fragment always wins at every pixel. Draw order still affects performance, and it matters a great deal for transparency, both covered below.
Turn it on: the 3-step checklist
Working depth testing needs a depth buffer, the test switched on, and the depth buffer cleared every frame. Miss any one and you get a black screen, objects showing through each other, or old frames blocking new ones.
Quick steps: enable depth testing
- Request a depth buffer when you create the window, context or framebuffer.
- Enable the test with glEnable(GL_DEPTH_TEST) or gl.enable(gl.DEPTH_TEST).
- Clear GL_DEPTH_BUFFER_BIT together with the color at the start of every frame.
Requesting a depth buffer (GLFW_DEPTH_BITS, GLUT_DEPTH, WebGL context attributes)
A depth buffer has to exist before you can test against it. Most toolkits create one by default, but not all of them, and never for an offscreen framebuffer you build yourself.
- GLFW:
glfwWindowHint(GLFW_DEPTH_BITS, 24)beforeglfwCreateWindow. 24 is GLFW’s default, so this is about being explicit. - GLUT / freeglut: you must include
GLUT_DEPTHinglutInitDisplayMode(GLUT_RGBA | GLUT_DOUBLE | GLUT_DEPTH). Leave it out and you get no depth buffer at all, which is a classic cause of “depth test does nothing”. - WebGL / WebGL2: the
depthcontext attribute defaults totrue, socanvas.getContext('webgl2')already has one. - Framebuffer objects: an FBO only has depth if you attach a depth texture or renderbuffer yourself.
Unsure whether you got a depth buffer? In desktop OpenGL with the default framebuffer bound, query glGetFramebufferAttachmentParameteriv(GL_FRAMEBUFFER, GL_DEPTH, GL_FRAMEBUFFER_ATTACHMENT_DEPTH_SIZE, &bits). In WebGL, check gl.getContextAttributes().depth and gl.getParameter(gl.DEPTH_BITS). Zero bits means no depth buffer.
glEnable(GL_DEPTH_TEST) and gl.enable(gl.DEPTH_TEST)
In OpenGL and WebGL the depth test is disabled by default. According to MDN Web Docs, WebGL depth testing is toggled with gl.enable and gl.disable(gl.DEPTH_TEST), and you can read the current function with gl.getParameter(gl.DEPTH_FUNC). Call glEnable after the context is current. Calling it before glfwMakeContextCurrent does nothing useful.
Studio tip
Pass GL_DEPTH_TEST and GL_CULL_FACE to glEnable in separate calls. They are capability enums, not bit flags, so glEnable(GL_DEPTH_TEST | GL_CULL_FACE) raises GL_INVALID_ENUM and enables neither.
Clearing with GL_DEPTH_BUFFER_BIT each frame
If you clear only the color buffer, last frame’s depth values stay in place. Anything that moves backwards then fails the test against its own old position. Clear both every frame:
// OpenGL 3.3 core with GLFW
glfwWindowHint(GLFW_DEPTH_BITS, 24);           // GLFW's default, shown for clarity
GLFWwindow* window = glfwCreateWindow(800, 600, "Depth", NULL, NULL);
glfwMakeContextCurrent(window);
// load GL function pointers here (glad, GLEW...)

glEnable(GL_DEPTH_TEST);   // off by default
glDepthFunc(GL_LESS);      // the default compare function while (!glfwWindowShouldClose(window)) {
    glClearColor(0.07f, 0.08f, 0.1f, 1.0f);
    glClearDepth(1.0);     // default: the far value
    glClear(GL_COLOR_BUFFER_BIT | GL_DEPTH_BUFFER_BIT);
    drawScene();
    glfwSwapBuffers(window);
    glfwPollEvents();
}
// WebGL2
const gl = canvas.getContext('webgl2', { depth: true }); // depth: true is the default
gl.enable(gl.DEPTH_TEST);
gl.depthFunc(gl.LESS);

function frame() {
  gl.clearColor(0.07, 0.08, 0.1, 1);
  gl.clearDepth(1.0);
  gl.clear(gl.COLOR_BUFFER_BIT | gl.DEPTH_BUFFER_BIT);
  drawScene(gl);
  requestAnimationFrame(frame);
}
requestAnimationFrame(frame);
One catch: glClear respects the depth mask. If you left glDepthMask(GL_FALSE) on from a transparent pass, the clear will not reset depth. Turn writes back on before clearing.
glDepthFunc: the 8 comparison functions, visualized
glDepthFunc sets the rule each fragment’s depth is compared with. There are eight options. The default in OpenGL and WebGL is LESS, three.js materials default to LessEqualDepth, and the TouchDesigner User Guide lists “Less than or Equal” as the MAT default.
The functions read as “the incoming depth is ___ the stored depth”:
| GL / WebGL constant | WebGPU string | Passes when incoming depth is… | Typical creative use |
|---|---|---|---|
GL_NEVER |
'never' |
never | Debugging: confirms the state is applied (screen goes blank) |
GL_LESS |
'less' |
less than stored | Default solid 3D |
GL_EQUAL |
'equal' |
exactly equal | Second pass after a depth pre-pass |
GL_LEQUAL |
'less-equal' |
less than or equal | Multi-pass lighting, skyboxes at depth 1.0 |
GL_GREATER |
'greater' |
greater than stored | X-ray views of hidden parts, reverse-Z |
GL_NOTEQUAL |
'not-equal' |
anything but equal | Rare. Masking out one exact depth layer |
GL_GEQUAL |
'greater-equal' |
greater than or equal | Reverse-Z multi-pass, hidden-line overlays |
GL_ALWAYS |
'always' |
always | Draw-order compositing while still writing depth |
The WebGPU names come from the GPUCompareFunction enum in the WebGPU IDL, published by the W3C GPU for the Web group. TouchDesigner’s MAT menu exposes six of these: Less Than, Less Than or Equal, Equal, Greater Than, Greater Than or Equal and Always.
Why GL_NEVER gives a blank screen and GL_ALWAYS looks like depth is off
GL_NEVER rejects every fragment, so only the clear color survives. That is the correct result, and it makes a handy sanity check that your state calls are landing on the right context.
GL_ALWAYS passes every fragment, so the last thing drawn wins, exactly like painter’s order. It differs from a disabled test in one way: with ALWAYS, passing fragments still write depth. A later pass using LESS will respect what was drawn, while a disabled test leaves the depth buffer untouched.
LEQUAL for multi-pass and skyboxes
A skybox drawn with its depth forced to exactly 1.0 (by setting gl_Position = pos.xyww) fails LESS against a buffer cleared to 1.0. Under LEQUAL it passes where nothing else was drawn and fails behind solid geometry. If you draw it last, the GPU skips shading the sky behind your scene.
Multi-pass effects need LEQUAL or EQUAL for a related reason. A second pass over the same geometry produces the same depth values, and LESS would reject them all.
GREATER for x-ray and reverse-Z
With a normal buffer cleared to 1.0, GREATER on its own draws nothing, because nothing is farther than the far plane. It becomes useful once something is already in the buffer. Draw a wall normally, then draw a character with GREATER and writes off, and only the parts hidden behind the wall appear. That is the x-ray silhouette effect from many games. In reverse-Z, GREATER is the default comparison, covered in the precision section.
Depth test vs depth write
The depth test decides whether a fragment is drawn. The depth write decides whether a drawn fragment updates the depth buffer. They are separate controls: glDepthMask(GL_FALSE) in OpenGL, gl.depthMask(false) in WebGL, depthWriteEnabled: false in WebGPU, material.depthWrite = false in three.js and the Write Depth Values toggle on a TouchDesigner MAT.
| Test | Write | Result | Use it for |
|---|---|---|---|
| On | On | Normal occlusion | Opaque geometry |
| On | Off | Hidden by solids, never hides anything | Particles, glows, transparent surfaces |
| Off | Off | Always on top, invisible to depth | HUDs, labels, gizmos drawn last |
| ALWAYS | On | Always drawn, still occludes later draws | Forcing an object into the depth buffer |
Read-only depth for particles and additive glows
Particles drawn as camera-facing quads with soft alpha edges are the textbook case. With writes on, the first particle’s transparent corners write depth, and the particles behind it get clipped into visible squares. With writes off, every particle still hides behind your solid geometry, but particles never block each other. With additive blending, their order no longer matters either.
Studio tip
For particles and additive glows, leave depthTest on and set depthWrite off. They sink behind solid objects but never cut holes in each other.
Why disabling the test also stops writes
In OpenGL and WebGL, when GL_DEPTH_TEST is disabled, the depth buffer is not updated at all, even if the depth mask is true. The TouchDesigner User Guide states the same for MATs: with the depth test off, depth values are never written. If you want an object that always draws but still occludes later geometry, keep the test enabled and set the function to ALWAYS.
Transparency: opaque first, then sorted transparent objects with writes off
The depth buffer stores one depth per pixel, so it cannot represent “glass in front of a tree”. The standard recipe:
- Draw all opaque objects with test and writes on.
- Sort transparent objects by distance from the camera, farthest first.
- Draw them with the test on and writes off, using normal alpha blending.
three.js follows this pattern automatically: with sortObjects on (the default), opaque objects are sorted roughly front to back and transparent ones back to front. renderOrder lets you override the order. Sorting per object breaks down for intersecting or self-overlapping transparent meshes. For those, order-independent techniques such as weighted blended OIT (McGuire and Bavoil, 2013) trade exactness for freedom from sorting.
The same depth controls in every tool
Every creative-coding environment exposes the same three controls (test, compare function, write) under different names. This table maps them side by side. Everything here is free to use. TouchDesigner has a free non-commercial licence.
| Tool | Enable/disable test | Compare function | Disable depth write | Request depth buffer | Default compare |
|---|---|---|---|---|---|
| OpenGL | glEnable/glDisable(GL_DEPTH_TEST) |
glDepthFunc(GL_LEQUAL) |
glDepthMask(GL_FALSE) |
GLFW_DEPTH_BITS, GLUT_DEPTH, FBO attachment |
GL_LESS (test off by default) |
| WebGL / WebGL2 | gl.enable/gl.disable(gl.DEPTH_TEST) |
gl.depthFunc(gl.LEQUAL) |
gl.depthMask(false) |
Context attribute depth: true (default) |
gl.LESS (test off by default) |
| WebGPU | Include or omit depthStencil on the pipeline |
depthCompare: 'less' |
depthWriteEnabled: false |
Create a depth texture, attach it to the pass | Set per pipeline |
| three.js | material.depthTest = false |
material.depthFunc = THREE.GreaterDepth |
material.depthWrite = false |
Renderer option depth: true (default) |
LessEqualDepth |
| p5.js (WEBGL) | No official switch; drawingContext.disable(gl.DEPTH_TEST) |
drawingContext.depthFunc(...) |
drawingContext.depthMask(false) |
setAttributes('depth', true) (default) |
Set by p5 at startup |
| Processing (P3D) | hint(DISABLE_DEPTH_TEST) / hint(ENABLE_DEPTH_TEST) |
Low-level PGL only |
hint(DISABLE_DEPTH_MASK) |
Built into P3D | Handled internally |
| TouchDesigner | MAT Common page: Depth Test | Depth Test Function menu | Write Depth Values toggle | Render TOP renders with depth | Less than or Equal |
OpenGL + GLFW
OpenGL is the Khronos Group API the other tools are modelled on, and the OpenGL Wiki is the most precise reference for its depth state. The full setup is in the checklist above. For render-to-texture, attach depth to your framebuffer:
GLuint rbo;
glGenRenderbuffers(1, &rbo);
glBindRenderbuffer(GL_RENDERBUFFER, rbo);
glRenderbufferStorage(GL_RENDERBUFFER, GL_DEPTH24_STENCIL8, width, height);
glFramebufferRenderbuffer(GL_FRAMEBUFFER, GL_DEPTH_STENCIL_ATTACHMENT,
                          GL_RENDERBUFFER, rbo);
// The renderbuffer must match the color attachment's size.
If you need to sample depth later, attach a GL_DEPTH_COMPONENT24 or GL_DEPTH_COMPONENT32F texture with glFramebufferTexture2D instead of a renderbuffer.
WebGL / WebGL2
WebGL mirrors OpenGL ES, so the calls match the C versions with a gl. prefix. MDN lists gl.LESS as the default function. In WebGL2, a depth texture for an FBO uses gl.DEPTH_COMPONENT24 with type gl.UNSIGNED_INT, or gl.DEPTH_COMPONENT32F with gl.FLOAT.
The canvas also behaves in a browser-specific way. With preserveDrawingBuffer: false (the default), the browser clears the drawing buffer, depth included, after each frame is shown. Raw WebGL trails therefore need preserveDrawingBuffer: true or an offscreen framebuffer.
WebGPU (depthStencil, depthCompare, depthWriteEnabled, depth24plus vs depth32float)
WebGPU has no global “enable depth” switch. Depth state is part of each render pipeline, and the depth texture is something you create and attach to every render pass yourself.
const depthTexture = device.createTexture({
  size: [canvas.width, canvas.height],
  format: 'depth24plus',
  usage: GPUTextureUsage.RENDER_ATTACHMENT,
});

const pipeline = device.createRenderPipeline({
  layout: 'auto',
  vertex: { module, entryPoint: 'vs' },
  fragment: { module, entryPoint: 'fs', targets: [{ format: presentationFormat }] },
  primitive: { topology: 'triangle-list', cullMode: 'back' },
  depthStencil: {
    format: 'depth24plus',      // must match the texture
    depthWriteEnabled: true,
    depthCompare: 'less',
  },
});

const pass = encoder.beginRenderPass({
  colorAttachments: [/* ... */],
  depthStencilAttachment: {
    view: depthTexture.createView(),
    depthClearValue: 1.0,
    depthLoadOp: 'clear',
    depthStoreOp: 'store',
  },
});
According to MDN’s createRenderPipeline page, the pipeline fails validation if writes are enabled or depthCompare is anything but 'always' while the format has no depth component. Chrome 120 made depthCompare and depthWriteEnabled optional only when they are not used.
Format choice matters more than in WebGL. depth24plus lets the implementation pick either a 24-bit or a 32-bit float format, as discussed on the W3C public-gpu mailing list. depth32float guarantees a float format, which you need for reverse-Z. depth32float-stencil8 is optional and must be requested as a device feature. Also available: depth16unorm and depth24plus-stencil8.
three.js (depthTest, depthWrite, depthFunc, logarithmicDepthBuffer, reversedDepthBuffer)
three.js puts depth controls on the material, so each object can behave differently:
import * as THREE from 'three';

const renderer = new THREE.WebGLRenderer({ antialias: true });

// Always-on-top label
const hudMat = new THREE.MeshBasicMaterial({ color: 0xffffff, depthTest: false, depthWrite: false });
hudMesh.renderOrder = 999; // draw last

// Glow sprite: hidden by walls, never blocks other glows
const glowMat = new THREE.MeshBasicMaterial({
  color: 0xffaa33, transparent: true, blending: THREE.AdditiveBlending, depthWrite: false,
});

// X-ray: only shows where something is in front of it
const xrayMat = new THREE.MeshBasicMaterial({
  color: 0x33ffcc, transparent: true, opacity: 0.6,
  depthFunc: THREE.GreaterDepth, depthWrite: false,
});
Precision options live on the renderer: logarithmicDepthBuffer: true and reversedDepthBuffer: true. Both are constructor parameters, so treat them as settings you choose when you create the renderer, not something to toggle mid-scene. To read depth as an image, give a WebGLRenderTarget a depthTexture = new THREE.DepthTexture(width, height).
p5.js (setAttributes depth, the raw-gl disable workaround)
The p5.js reference describes the depth attribute of setAttributes() as defaulting to true, which asks for a depth buffer of at least 16 bits. p5.js has no official function to turn the depth test off. The workaround, discussed on the Processing Foundation’s Discourse forum, is to call the WebGL context directly:
function setup() {
  createCanvas(600, 400, WEBGL);
  setAttributes('depth', true); // the default; re-creates the WebGL context
}

function draw() {
  background(20);
  const gl = drawingContext;    // raw WebGLRenderingContext in WEBGL mode
  normalMaterial();
  box(150);

  gl.disable(gl.DEPTH_TEST);    // like Processing's hint(DISABLE_DEPTH_TEST)
  fill(255, 80, 80);
  translate(0, 0, -300);        // far behind the box, yet drawn on top
  sphere(40);
  gl.enable(gl.DEPTH_TEST);     // restore for the next frame
}
Always restore the state you change. p5 does not know you touched it, and the next frame inherits whatever you left behind. For more on why p5.js suits this kind of exploration, see our guide to what p5.js is and why artists love it.
Processing (hint DISABLE_DEPTH_TEST, ENABLE_DEPTH_SORT)
Processing’s P3D renderer manages depth internally and exposes it through hint(). According to the Processing reference, hint(DISABLE_DEPTH_TEST) turns off the z-buffer so new drawing covers old pixels. hint(ENABLE_DEPTH_SORT) z-sorts triangles and lines, but it can noticeably slow performance and does not sort perfectly.
void setup() {
  size(800, 600, P3D);
}

void draw() {
  background(20);
  lights();
  drawScene();
  hint(DISABLE_DEPTH_TEST);   // HUD on top
  drawHud();
  hint(ENABLE_DEPTH_TEST);    // back to normal for next frame
}
“DISABLE_DEPTH_TEST not working in P3D” usually comes down to one of three things. The sketch is using the default 2D renderer, the hint is set once in setup() and re-enabled elsewhere, or the drawing happens on a PGraphics, which needs pg.hint(...) on that buffer. For “ENABLE_DEPTH_SORT doesn’t fix ordering with PShape”, the dependable fix is to sort your shapes by distance yourself and draw them back to front with depth writes off.
TouchDesigner (MAT Common page, Depth TOP)
TouchDesigner, made by Derivative, controls depth per material. On any MAT’s Common page you will find the Depth Test toggle, the Depth Test Function menu (default Less than or Equal) and Write Depth Values. The User Guide notes that a material with writes off is still tested and its color still draws, which suits particle systems.
To get depth as an image, connect a Render TOP to a Depth TOP. The Derivative documentation says the Depth TOP returns 24-bit depth, so set downstream TOPs to a 16- or 32-bit pixel format to keep the precision. Once a depth network works, you can package it as a reusable component, explained in our article on what a .tox file is.
Heads up
An 8-bit TOP after a Depth TOP throws away most of the depth range and gives visible banding in fog or depth-of-field effects. Use 16-bit or 32-bit float.
Depth precision and z-fighting
Z-fighting is the flicker you see when two surfaces sit so close together that the depth buffer cannot tell them apart. Perspective depth is non-linear: precision piles up near the camera and thins out with distance. Most z-fighting at long range comes from a near plane set too close, not from the far plane.
Why the near plane matters more than the far plane
A perspective projection stores depth as roughly 1/z, not z. Normalized depth is d = f/(f−n) × (1 − n/z), where n and f are the near and far distances. That curve rises steeply just past the near plane and flattens out far away. The table below applies the formula with the far plane fixed at 100 units:
| Near plane | 50% of depth values used by | 90% used by | 99% used by |
|---|---|---|---|
| 0.01 | 0.02 units | 0.10 units | 0.99 units |
| 0.1 | 0.20 units | 0.99 units | 9.1 units |
| 1.0 | 1.98 units | 9.2 units | 50.3 units |
With near = 0.1, 99% of your depth values are spent in the first 9.1 units. Everything from 9.1 to 100 shares the last 1%. Moving the near plane to 1.0 pushes that 99% mark out to about 50 units, a far bigger gain than any change to the far plane. A near plane of 0 is the worst case: every depth collapses to the same value and everything fights.
Studio tip
Push the near plane as far out as your scene allows (0.1 to 1.0 is often painless) before you reach for logarithmic depth or reverse-Z.
16 vs 24 vs 32-bit depth
The bit depth sets how many distinct steps the curve above gets divided into. One correction to wording you will see elsewhere: 16-bit and 24-bit depth formats are normally fixed-point (unsigned normalized), not floats. Only the 32-bit option is a true float.
| Format | Type | Distinct values | Names in OpenGL / WebGPU |
|---|---|---|---|
| 16-bit | Fixed-point (unorm) | 65,536 | GL_DEPTH_COMPONENT16 / depth16unorm |
| 24-bit | Fixed-point (unorm) | 16,777,216 | GL_DEPTH_COMPONENT24, GL_DEPTH24_STENCIL8 / depth24plus (may be 24-bit) |
| 32-bit float | IEEE float, 24-bit significand | Uneven: dense near 0.0 | GL_DEPTH_COMPONENT32F / depth32float |
A 32-bit float on its own does not fix much under the standard convention. Floats are densest near 0.0, while standard depth needs its precision near 1.0 for distant objects. Reverse-Z exists to line those two up.
Polygon offset for decals and outlines
For surfaces that are meant to be coplanar, such as decals, road markings or a wireframe drawn over a solid, push one of them slightly in depth. In OpenGL, glEnable(GL_POLYGON_OFFSET_FILL) with glPolygonOffset(factor, units). In WebGL, gl.polygonOffset. In three.js, material.polygonOffset = true with polygonOffsetFactor and polygonOffsetUnits. In WebGPU, depthBias and depthBiasSlopeScale on the depth-stencil state. Start with small values such as factor 1, units 1, and adjust.
Reverse-Z in three.js (r179 name change, EXT_clip_control) and WebGPU
Reverse-Z maps the near plane to 1.0 and the far plane to 0.0, then stores depth as a 32-bit float. Float precision is densest near 0.0, which is exactly where 1/z depth is sparsest, so the two errors largely cancel. Precision ends up spread much more evenly across the scene.
The WebGPU recipe, as shown in the webgpu-native-examples reversed-Z sample, has three parts:
- Use a
depth32floatdepth texture and clear it to0.0(depthClearValue: 0.0). - Set
depthCompare: 'greater'(or'greater-equal'). - Multiply your projection matrix by a remap matrix that flips z:
z' = w − zin clip space.
WebGPU already uses a 0 to 1 clip-space depth range, so no extension is needed. Desktop OpenGL needs glClipControl(GL_LOWER_LEFT, GL_ZERO_TO_ONE) (core since OpenGL 4.5). WebGL needs the EXT_clip_control extension.
In three.js, reverse-Z arrived for WebGLRenderer in pull request #29445, merged on 21 September 2024 and built on EXT_clip_control. The PR describes it as a strict improvement over logarithmic depth where supported. In r179 the option was renamed from reverseDepthBuffer to reversedDepthBuffer. That explains the forum report “reverseDepthBuffer works instead of reversedDepthBuffer”: that project was on r178 or earlier. On r179 and later, use the new name.
WebGPURenderer support is newer than many forum answers suggest. A December 2025 reply on the three.js forum said it was not supported yet. The r183 changelog (February 2026) then added basic reversed depth support for WebGPURenderer, and later releases kept fixing related shadow and depth issues. A fix merged on 30 October 2026 (PR #35276) makes the reversed buffer take precedence when both it and logarithmicDepthBuffer are enabled. three.js also has an official side-by-side example comparing a normal and a reversed z-buffer, the quickest way to see the difference.
Did you know?
In the reversed-Z sample from the webgpu-native-examples project, depth is cleared to 0.0 and the compare function becomes ‘greater’, the opposite of the usual 1.0 and ‘less’. Any custom shader that linearizes depth has to flip its formula to match.
| Fix | Effort | Where supported | Trade-off |
|---|---|---|---|
| Move the near plane out | Minutes | Everywhere | Close objects get clipped |
| Pull the far plane in | Minutes | Everywhere | Small gain. Needs fog or LOD to hide the cut-off |
| Polygon offset / depth bias | Low | OpenGL, WebGL, WebGPU, three.js | Fixes chosen surfaces only, needs tuning |
| 32-bit float depth | Low | GL_DEPTH_COMPONENT32F, depth32float |
More memory, small gain without reverse-Z |
| Logarithmic depth | Low (one flag in three.js) | three.js logarithmicDepthBuffer, custom shaders |
Writes per-fragment depth, which disables early-Z |
| Reverse-Z | Medium | WebGPU, OpenGL 4.5, WebGL with EXT_clip_control, three.js reversedDepthBuffer |
Needs float depth. Custom depth math must be flipped |
So should you use reverse-Z? For large outdoor scenes, planetary scales or any shot where the camera sits close to geometry while distant mountains stay visible, yes. For a sketch that fits inside a 50-unit box, a sensible near plane is enough, and reverse-Z just adds one more thing to keep consistent.
Seeing the depth buffer: linearizing and visualizing
Displaying raw depth as grayscale gives an almost all-white image, because most of the scene sits close to 1.0. To see real distances, convert depth back to linear eye-space distance, then divide by the far plane.
Linearize depth formula
For OpenGL and WebGL, where clip-space depth runs from −1 to 1:
uniform float near;
uniform float far;

float linearizeDepth(float d) {          // d from the depth texture, 0..1
    float z = d * 2.0 - 1.0;             // back to NDC -1..1
    return (2.0 * near * far) / (far + near - z * (far - near));
}

void main() {
    float depth = texture(uDepthTex, vUv).r;
    float linear = linearizeDepth(depth) / far;  // 0 near .. 1 far
    fragColor = vec4(vec3(linear), 1.0);
}
For APIs with a 0 to 1 depth range, such as WebGPU or GL with glClipControl, the equivalent is near * far / (far - d * (far - near)). With reverse-Z, swap near and far in that expression. three.js ships helpers for this in its packing shader chunk (perspectiveDepthToViewZ, viewZToOrthographicDepth), which handle the conversion for you.
Rendering depth to a texture
To sample depth, it has to live in a texture, not a renderbuffer:
- OpenGL / WebGL2: attach a
DEPTH_COMPONENT24orDEPTH_COMPONENT32Ftexture to your FBO withglFramebufferTexture2D(..., GL_DEPTH_ATTACHMENT, ...). - three.js: set
renderTarget.depthTexture = new THREE.DepthTexture(w, h), render the scene into it, then samplerenderTarget.depthTexturein a post-processing pass. - WebGPU: add
GPUTextureUsage.TEXTURE_BINDINGto the depth texture’s usage and bind it as atexture_depth_2din WGSL. - TouchDesigner: Render TOP into Depth TOP, then use a 16- or 32-bit pixel format.
Multisampling adds a wrinkle. MSAA stores depth per sample, so a multisampled render target needs a multisampled depth attachment, and sampling it takes an extra resolve step. Our article on antialiasing techniques for real-time graphics covers why.
Using depth as an artistic input (fog, DOF, contour lines)
Once depth is an image, it becomes material to work with:
- Fog: mix toward a fog color by
smoothstep(fogStart, fogEnd, linearDepth). - Depth of field: blur more where linear depth is far from a focus distance.
- Contour lines:
fract(linearDepth * 40.0) < 0.05draws topographic bands across the scene. - Edge detection: large depth differences between neighbouring pixels mark silhouettes for ink-style outlines.
- Masks for projection: a depth map of a physical object can drive masks in projection mapping work.
Early depth testing and performance
GPUs try to run the depth test before the fragment shader, so hidden fragments never get shaded. This is early-Z, and with expensive shaders it can be worth a large share of your frame time. It only works when the shader cannot change the outcome of the test.
Did you know?
The Khronos OpenGL Wiki notes that the depth test can run before the fragment shader only if the shader neither discards the fragment nor modifies gl_FragDepth. One stray discard for alpha-cutout leaves can quietly make a whole forest shade every hidden pixel.
What turns early-Z off
discard: the GPU cannot write depth before it knows whether the fragment survives. Alpha-tested foliage, dithered fades and cutout sprites all hit this.- Writing
gl_FragDepth: the final depth is unknown until the shader runs. Logarithmic depth buffers that write per-fragment depth fall into this category. - Alpha-to-coverage and some blend and stencil setups, depending on the hardware.
layout(early_fragment_tests) in;
From OpenGL 4.2, you can force the tests to run early:
\#version 420
layout(early_fragment_tests) in;
The OpenGL Wiki warns that while this is active, writes to gl_FragDepth are ignored. Depth is committed before your shader runs, and a discard no longer prevents the depth write. Use it when you know those conditions hold, for example in image-load-store shaders that must not run for hidden fragments.
The gentler option is conservative depth (ARB_conservative_depth, core in OpenGL 4.2). You promise which direction you will move depth, and the driver can keep some optimizations:
\#version 420
// We only ever push depth farther away, never closer.
layout(depth_greater) out float gl_FragDepth;
The qualifiers are depth_any, depth_greater, depth_less and depth_unchanged.
Depth pre-pass for heavy shaders
If shading is the bottleneck, as with raymarched materials, many lights or layered noise, render the scene twice:
- Depth pass: draw all opaque geometry with color writes off (
glColorMask(GL_FALSE, GL_FALSE, GL_FALSE, GL_FALSE)) and depth writes on, using a trivial shader. - Shading pass: turn color writes on and depth writes off, and set
glDepthFunc(GL_LEQUAL)orGL_EQUAL. Only the visible fragment at each pixel gets shaded.
The pre-pass doubles vertex work, so it pays off only when fragments are expensive. A simpler first step is to draw opaque objects roughly front to back, which lets early-Z reject more of what follows.
Depth testing not working? Symptom to fix
Most depth bugs come from a handful of causes: no depth buffer, no clear, wrong state at the wrong time, or a projection that squashes depth. Match the symptom, then apply the fix.
| Symptom | Likely cause | Fix |
|---|---|---|
| Objects behind are drawn on top | Test never enabled, or enabled before the context was current | Call glEnable(GL_DEPTH_TEST) after glfwMakeContextCurrent |
| Same as above, test is enabled | No depth buffer in the context | Add GLUT_DEPTH, check GLFW_DEPTH_BITS, query depth bits |
| Black screen after enabling the test | Depth not cleared, so last frame blocks this one | glClear(GL_COLOR_BUFFER_BIT \| GL_DEPTH_BUFFER_BIT) every frame |
| Black screen, clear is in place | Depth mask left false, so the clear is skipped | glDepthMask(GL_TRUE) before glClear |
| Black or no occlusion after render-to-texture | FBO has no depth attachment, or its size differs from the color one | Attach a matching-size depth renderbuffer or texture, clear with the FBO bound |
| Flickering, jagged intersections far away | Z-fighting from a tiny near plane | Raise the near plane, then try polygon offset or reverse-Z |
| Everything flickers or vanishes | Near plane set to 0 | Use a positive near value, such as 0.1 or more |
| Scene appears inside out | Compare function and clear value mismatched (for example clear 0.0 with LESS) |
Clear 1.0 with LESS, or 0.0 with GREATER for reverse-Z |
GL_INVALID_ENUM, depth and culling both off |
glEnable(GL_DEPTH_TEST \| GL_CULL_FACE) |
Two separate glEnable calls |
| Transparent object hides things behind it | Transparent pass still writes depth | Draw transparent objects last, sorted, with writes off |
| Particles cut each other into squares | Particles write depth | depthWrite = false, keep depthTest on |
| three.js reverse-Z option ignored | Wrong option name for your version | reversedDepthBuffer on r179+, reverseDepthBuffer before |
Studio tip
If the screen goes black after you enable the depth test, check first that GL_DEPTH_BUFFER_BIT is cleared every frame, then that your context or FBO actually has a depth attachment.
Creative tricks with depth
Depth state is a compositing tool as much as a correctness feature. Bending the rules on purpose gives you overlays, x-ray views, ghosts and accumulation effects that would otherwise need extra render passes.
Always-on-top overlays
HUDs, labels, gizmos and debug axes should ignore the scene. Set the test off and writes off, and draw them last. In three.js: depthTest: false, depthWrite: false plus a high renderOrder. In Processing: wrap the drawing in hint(DISABLE_DEPTH_TEST) and hint(ENABLE_DEPTH_TEST). The live sketch below uses this trick for its own label.
X-ray and hidden-line effects
Draw the scene normally. Then draw the hero object again with GREATER (THREE.GreaterDepth, 'greater' in WebGPU), writes off, in a flat or rim-lit color. Only the parts hidden behind other geometry appear, which gives you a silhouette visible through walls. For technical-drawing hidden lines, draw a wireframe the same way with a dashed shader.
“Ghost” geometry works the same way in reverse: a translucent figure drawn with the test on and writes off. It sinks behind solid objects but never blocks anything drawn after it, so other ghosts and particles pass straight through.
Accumulation and trails
Skip the color clear and you get trails. What you do with depth decides the look:
- Clear depth, keep color: each frame tests only against itself, and old frames smear underneath like paint.
- Keep both: old frames still occlude new ones, and the motion builds a solid, sculptural mass that new strokes must climb over.
- Disable the test entirely: pure painter’s accumulation, good for a Perlin noise flow field drawn with thousands of 3D strokes.
In raw WebGL, remember the browser clears the canvas after compositing unless preserveDrawingBuffer is true. Rendering into your own framebuffer is the more reliable route.
Depth-driven post effects
Read the depth texture back into a full-screen shader for fog, depth of field, contour bands or outline detection, as covered in the visualization section. Depth also makes a strong control signal. Map it to color palettes, use it to displace a second render, or threshold it into silhouettes for live visuals in TouchDesigner.
Try it live
This sketch draws a grey wall normally, then a spinning torus that passes through it using whichever depth function you pick. Press 1 to 8 (or click) to step through NEVER to ALWAYS, and W to switch the torus’s depth writes. Watch GREATER: only the part of the torus hidden behind the wall appears. The label uses the always-on-top trick.
// Depth test playground (p5.js 1.x, WEBGL)
// A grey wall is drawn with normal depth testing.
// A torus passes through it and is drawn with the depth function you pick.
// Keys 1-8 pick a function, W toggles torus depth writes, click steps forward.

let gl;
let hud;              // 2D buffer used as an always-on-top label
let mode = 1;         // start on LESS
let writeTorus = true;
const NAMES = ['NEVER', 'LESS', 'EQUAL', 'LEQUAL',
               'GREATER', 'NOTEQUAL', 'GEQUAL', 'ALWAYS'];

function setup() {
  createCanvas(720, 480, WEBGL);
  gl = drawingContext;          // the raw WebGL context p5 draws with
  hud = createGraphics(440, 70);
  noStroke();
}

// Map our list index to the real WebGL constant
function depthConst(i) {
  const c = [gl.NEVER, gl.LESS, gl.EQUAL, gl.LEQUAL,
             gl.GREATER, gl.NOTEQUAL, gl.GEQUAL, gl.ALWAYS];
  return c[i];
}

function draw() {
  // background() clears colour and depth (depth goes back to 1.0, the far value)
  background(18, 20, 28);

  // 1. The wall: ordinary depth testing and writing
  gl.enable(gl.DEPTH_TEST);
  gl.depthFunc(gl.LESS);
  gl.depthMask(true);
  push();
  rotateY(sin(frameCount * 0.005) * 0.3);
  fill(80, 90, 110);
  box(420, 300, 12);
  pop();

  // 2. The torus: tested with the chosen function
  gl.depthFunc(depthConst(mode));
  gl.depthMask(writeTorus);
  push();
  rotateX(frameCount * 0.011);
  rotateY(frameCount * 0.017);
  normalMaterial();
  torus(130, 42, 48, 24);
  pop();

  // Restore defaults so next frame's background() can clear depth
  gl.depthMask(true);
  gl.depthFunc(gl.LESS);

  // 3. The label: depth test off so it always sits on top
  drawHud();
}

function drawHud() {
  hud.clear();
  hud.background(0, 160);
  hud.fill(255);
  hud.textSize(22);
  hud.text('depthFunc: ' + NAMES[mode], 14, 30);
  hud.textSize(14);
  hud.text('keys 1-8 or click: change    W: torus writes ' +
           (writeTorus ? 'ON' : 'OFF'), 14, 56);

  gl.disable(gl.DEPTH_TEST);   // overlay ignores the scene completely
  push();
  translate(-width / 2 + hud.width / 2 + 10, -height / 2 + hud.height / 2 + 10, 0);
  texture(hud);
  plane(hud.width, hud.height);
  pop();
  gl.enable(gl.DEPTH_TEST);
}

function keyPressed() {
  if (key >= '1' && key <= '8') mode = int(key) - 1;
  if (key === 'w' || key === 'W') writeTorus = !writeTorus;
}

function mousePressed() {
  mode = (mode + 1) % NAMES.length;
}
Try these variations. Clear depth to 0.0 with gl.clearDepth(0) before background() and watch which functions still draw. Give the wall a second, closer copy and see how GEQUAL layers them. Or comment out background() to see how trails interact with each depth mode.
FAQ
What is depth testing in OpenGL?
It is the fixed-function step that compares each fragment’s depth with the value stored in the depth buffer and discards fragments that fail. With the default GL_LESS, only the surface closest to the camera survives at each pixel. It is disabled by default and enabled with glEnable(GL_DEPTH_TEST).
How do I enable depth testing with glEnable(GL_DEPTH_TEST)?
Make sure your context has a depth buffer, call glEnable(GL_DEPTH_TEST) once the context is current, and clear with glClear(GL_COLOR_BUFFER_BIT | GL_DEPTH_BUFFER_BIT) at the start of every frame. In WebGL the call is gl.enable(gl.DEPTH_TEST).
What does glDepthFunc do and what is the default?
It sets the comparison between incoming and stored depth: NEVER, LESS, EQUAL, LEQUAL, GREATER, NOTEQUAL, GEQUAL or ALWAYS. OpenGL and WebGL default to LESS. three.js materials default to LessEqualDepth, and TouchDesigner MATs to Less than or Equal.
What is the difference between depth test and depth write (glDepthMask)?
The test decides whether a fragment is drawn. The write decides whether a drawn fragment updates the depth buffer. glDepthMask(GL_FALSE) keeps testing but stops writing, which is the right setup for particles, glows and transparent surfaces.
Why is my screen black after enabling GL_DEPTH_TEST?
Usually the depth buffer is not cleared each frame, or the depth mask was false when you cleared. If you render to a texture, the framebuffer may have no depth attachment, or one of a different size. Check those three things in that order.
How do I get a depth buffer with GLFW?
GLFW requests a 24-bit depth buffer by default. To be explicit, call glfwWindowHint(GLFW_DEPTH_BITS, 24) before glfwCreateWindow. To confirm it, query GL_FRAMEBUFFER_ATTACHMENT_DEPTH_SIZE on the default framebuffer’s GL_DEPTH attachment.
What causes z-fighting and how do I fix it?
Two surfaces land on the same depth value because perspective depth runs out of precision at a distance, and a near plane that is too close makes this much worse. Raise the near plane first. Use polygon offset for coplanar decals. For huge scenes, switch to reverse-Z with a 32-bit float depth buffer.
What is reverse-Z and should I use it?
Reverse-Z maps near to 1.0 and far to 0.0, clears depth to 0.0 and tests with GREATER. With float depth it spreads precision evenly. Use it for large scenes: in three.js set reversedDepthBuffer: true (r179+, on WebGL through EXT_clip_control, on WebGPURenderer since r183), or follow the WebGPU recipe above.
How do I visualize or linearize the depth buffer?
Render depth into a texture, sample it and convert it with the linearize formula, then divide by the far plane to get a 0 to 1 grayscale image. In TouchDesigner, use a Depth TOP. In three.js, use a DepthTexture on a render target.
How do I turn off depth testing in p5.js or Processing?
In Processing’s P3D renderer, call hint(DISABLE_DEPTH_TEST), then hint(ENABLE_DEPTH_TEST) to restore it. p5.js has no equivalent function. Use drawingContext.disable(drawingContext.DEPTH_TEST) in WEBGL mode, and re-enable it before the next frame.
On this article
- Facts were checked against the sources below before publication.
- Published
Sources (8)
- WebGLRenderingContext: depthFunc() method - MDN (developer.mozilla.org)
- Depth Test - OpenGL Wiki (wikis.khronos.org)
- Early Fragment Test - OpenGL Wiki (wikis.khronos.org)
- ARB_conservative_depth specification (developer.download.nvidia.com)
- WebGPU IDL (docs.rs)
- public-gpu mailing list: depth24plus discussion (lists.w3.org)
- webgpu-native-examples: reversed_z.c (raw.githubusercontent.com)
- GPUDevice: createRenderPipeline() method - MDN (developer.mozilla.org)